Top Ad 728x90

Saturday, May 30, 2026

Nana beth made this

by


 This raspberry dump cake is the kind of dessert you pull together when guests are already on their way and you still want the house to smell like you planned ahead. It’s a Midwestern potluck classic: a simple combination of canned raspberry pie filling, dry yellow cake mix, and melted butter that bakes into a jammy, bubbling fruit layer under a crisp, golden top. No mixers, no bowls to wash—everything comes together right in a clear glass casserole dish, just like the ones so many grandmothers relied on for last-minute company desserts.

Freshly baked raspberry dump cake in a glass casserole dish
Serve this raspberry dump cake warm, scooped straight from the glass casserole dish so the deep red fruit and golden crumbs are visible. A scoop of vanilla ice cream or a dollop of lightly sweetened whipped cream softens the crunchy top and contrasts nicely with the tart raspberries. Coffee or black tea are natural pairings, but a lightly chilled rosé or sparkling wine also works if you’re leaning into dessert as a casual, end-of-evening treat. It’s rich enough to stand alone—no need for extra sides—so think of it as the sweet finish to a simple soup-and-salad or roast chicken dinner.
Raspberry Dump Cake
Servings: 8

Ingredients
2 cans (21 ounces each) raspberry pie filling
1 box (15.25 ounces) yellow cake mix (dry, unprepared)
1/2 cup (1 stick, 8 tablespoons) unsalted butter, melted
Nonstick cooking spray or a little butter for greasing the dish
Directions
Preheat your oven to 350°F (175°C). Lightly grease a 9x13-inch clear glass baking dish with nonstick spray or a thin coat of butter. The glass dish lets you see the deep red fruit bubbling under the golden topping as it bakes, just like the old-school versions.
Greased glass baking dish with raspberry filling ready to spread
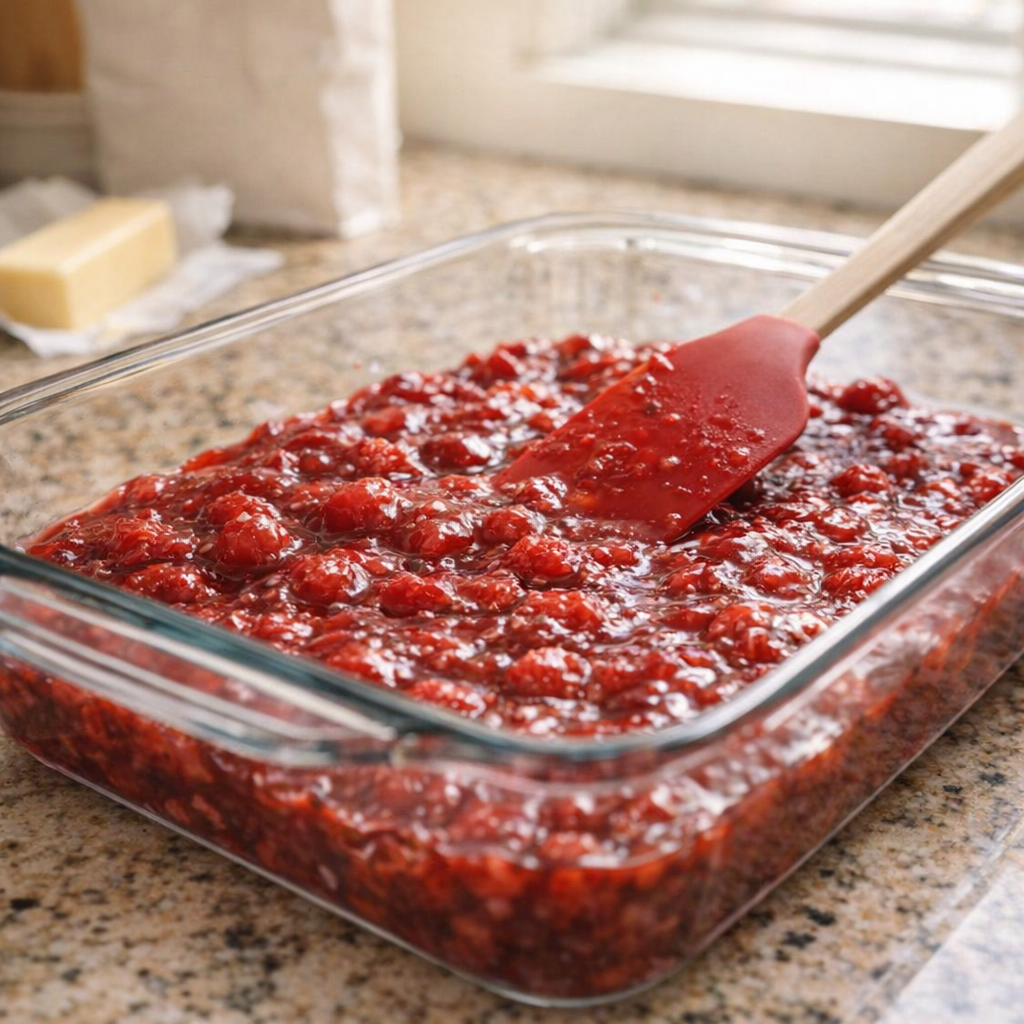
Pour both cans of raspberry pie filling into the prepared baking dish. Use a spatula to spread the filling into an even layer, making sure it reaches all the corners so every portion has a jammy middle.
Sprinkle the dry yellow cake mix evenly over the raspberry filling. Do not mix. Gently shake the dish or tap it on the counter to help the cake mix settle into an even layer, covering the fruit from edge to edge.
Slowly drizzle the melted butter evenly over the surface of the dry cake mix. Aim to moisten as much of the cake mix as possible; focus on the corners and any dry patches you can see. It’s fine if a few small dry spots remain—those often bake into extra-crispy bits.
Dry cake mix and melted butter layered over raspberry filling
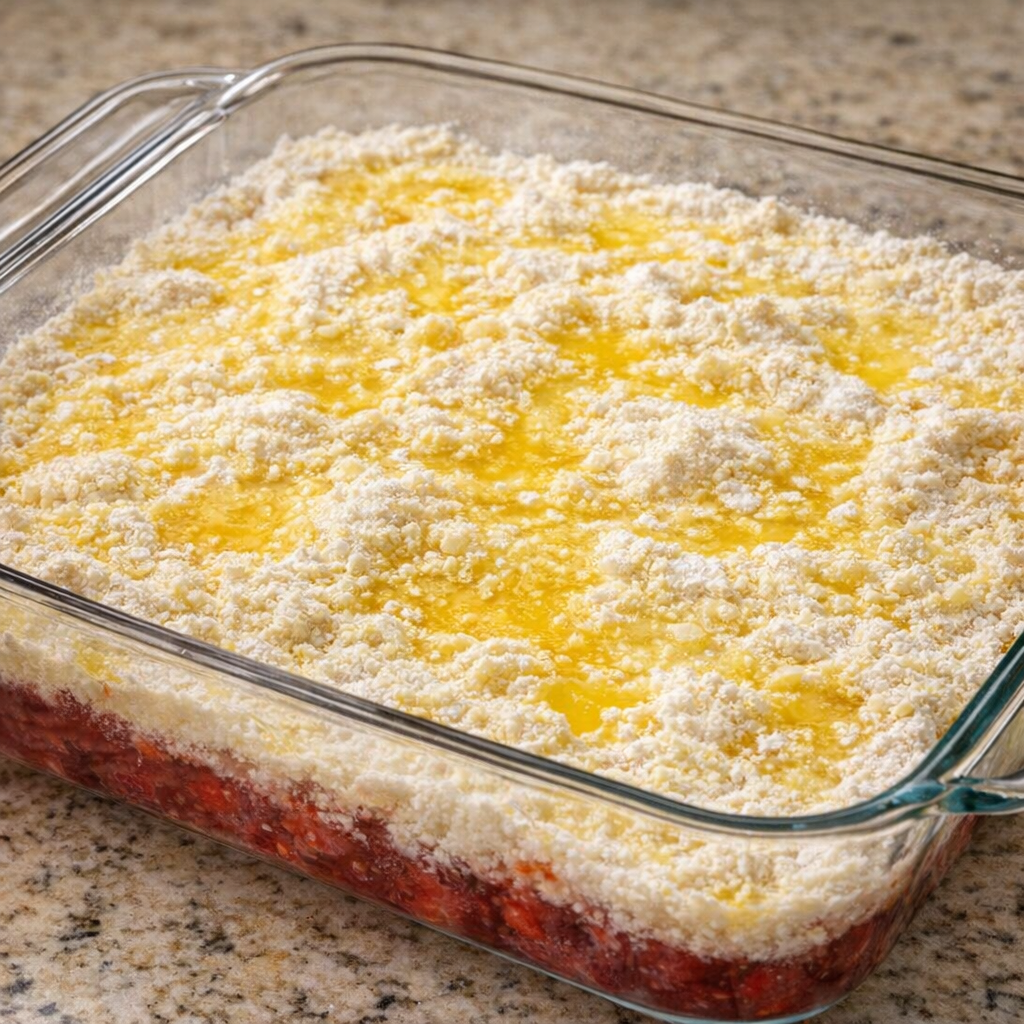
Place the baking dish on the center rack of the preheated oven. Bake for 35 to 45 minutes, or until the top is deeply golden brown, crisp in spots, and the raspberry filling is bubbling up around the edges. The center should look set, not dusty with dry cake mix.
Remove the dish from the oven and let the dump cake cool on a heat-safe surface for at least 15 to 20 minutes. This short rest lets the jammy middle thicken slightly while keeping the top crisp.
Warm serving of raspberry dump cake with vanilla ice cream
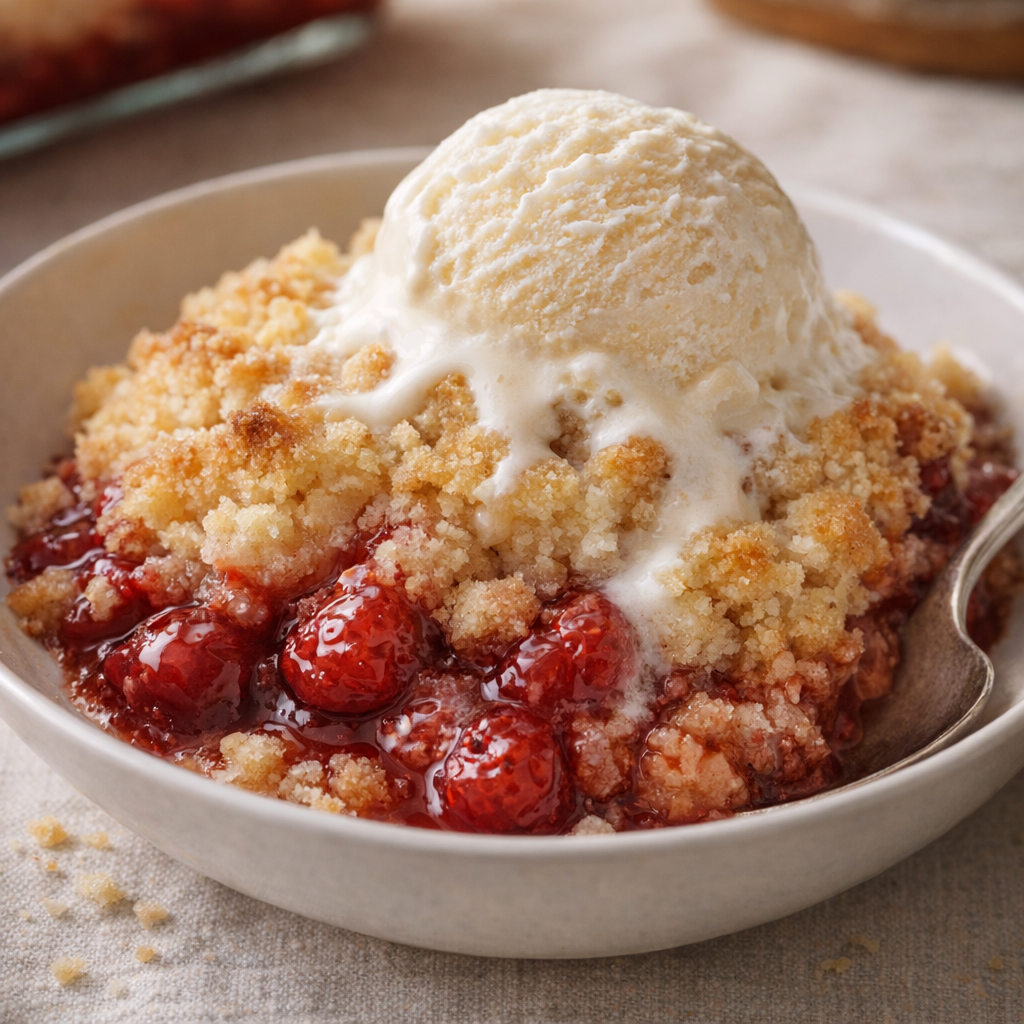
Serve warm, scooping down through the crisp topping to the bubbling raspberry layer. If you like, add vanilla ice cream or whipped cream on top. Store any leftovers, cooled to room temperature, covered in the refrigerator for up to 3 days; rewarm individual portions gently in the microwave or a low oven.
Variations & Tips
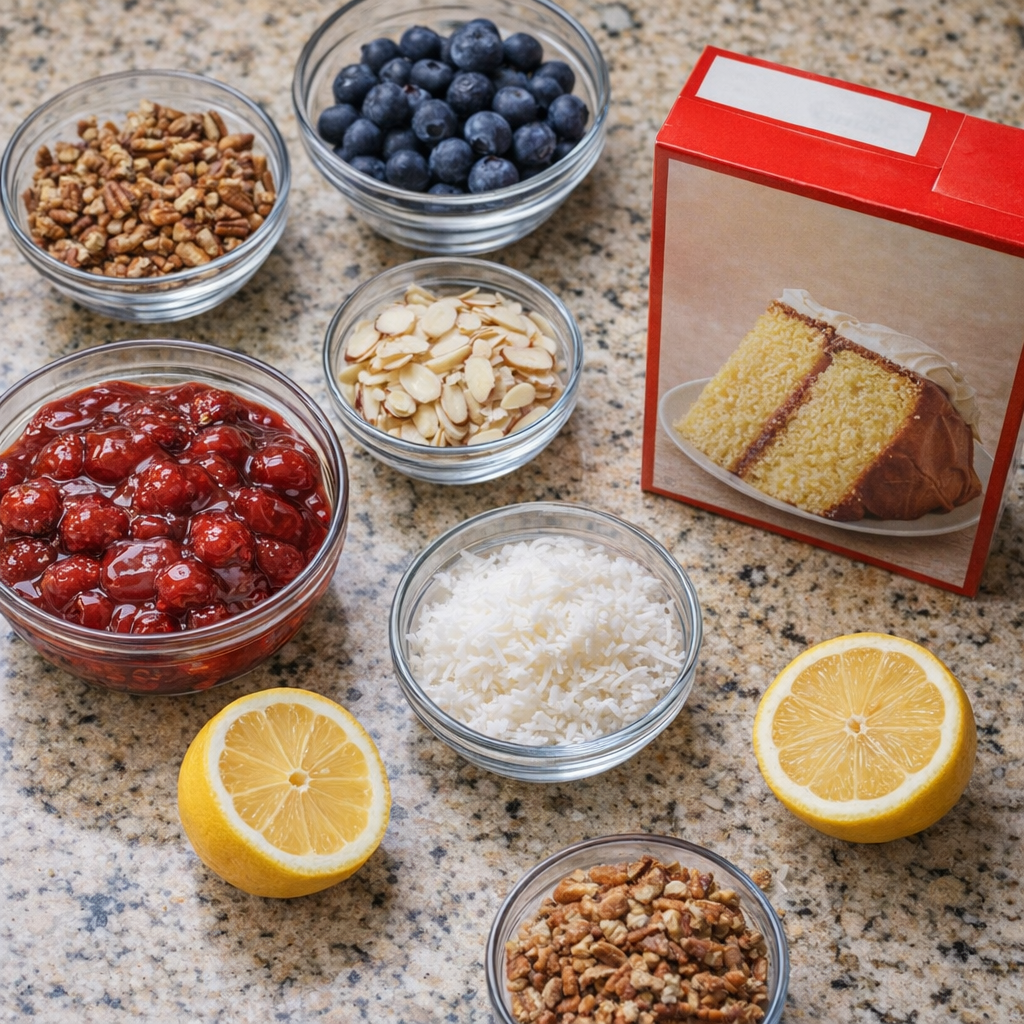
To keep this recipe stress-free but still adaptable, start with the same basic method and swap where it makes sense. For a mixed-berry version, replace one can of raspberry pie filling with cherry or blueberry pie filling; the baking time stays the same, but the flavor deepens and the color becomes even more jewel-like through the glass dish.
If you prefer a slightly less sweet dessert, look for a pie filling labeled “no sugar added” or stir a squeeze of fresh lemon juice into the filling before adding the cake mix. You can also add texture to the topping by sprinkling 1/2 cup of chopped nuts (such as sliced almonds or pecans) or 1/3 cup of unsweetened shredded coconut over the dry cake mix before drizzling on the butter.
Ingredient variation setup with berries, nuts, and coconut
For a more pronounced buttery, crunchy top, increase the melted butter to 3/4 cup, understanding that the dessert will be richer and slightly more indulgent.
Food safety tips: Always make sure the dump cake cools briefly before serving; the fruit layer can be extremely hot and may cause burns if eaten straight from the oven. Because this dessert contains fruit and butter, store leftovers covered in the refrigerator rather than at room temperature, and discard any portion that has sat out for more than 2 hours at typical room temperatures (or 1 hour if your kitchen is unusually warm). Reheat only what you plan to eat, and avoid reheating multiple times to keep quality and safety in check.

Aunt Donna swears

by


 This little icebox cake comes straight from my sister-in-law Donna, who swears it’s the fastest way to bring spring vibes to the table, even if there’s still a chill in the air and a little snow left in the fencerows. It’s just layers of graham crackers, key lime yogurt, and a billowy whipped topping, tucked into a glass baking dish and left to soften in the fridge.

Glass dish of key lime icebox cake on a farmhouse table

The crackers turn tender like cake, the pale green filling looks fresh as new grass, and you can slice it cold and watch it disappear at any church potluck or Sunday dinner. It’s a no-bake, no-fuss dessert any home cook can pull together in minutes.

Serve this key lime icebox cake straight from the refrigerator, good and cold, with the layers set and the top smooth and creamy. A few thin lime slices or a light sprinkle of graham cracker crumbs on top make it look company-ready without much trouble.

Slice of key lime icebox cake on a dessert plate

It pairs nicely with simple suppers—grilled chicken, baked ham, or a pot of sloppy joes—because it’s light, cool, and just tart enough to feel refreshing. Offer coffee or hot tea alongside for the grown-ups, and a cold glass of milk for the kids, and you’ll have a table that feels like spring, no matter the season.

Aunt Donna’s Key Lime Icebox Cake

Servings: 12


Ingredients

Key lime icebox cake ingredients arranged on a kitchen counter

1 (14.4 oz) box honey graham crackers

4 (5–6 oz each) cups key lime yogurt, well chilled
1 (8 oz) package cream cheese, softened to room temperature
1/2 cup powdered sugar
1 teaspoon pure vanilla extract
1 (8 oz) tub frozen whipped topping, thawed
1 tablespoon fresh lime juice (optional, for extra tang)
1 teaspoon finely grated lime zest (plus a little extra for garnish, optional)
Additional graham cracker crumbs or lime slices for garnish (optional)

Directions

Set out a 9x13-inch glass baking dish on the counter so it’s ready for layering. Make sure your whipped topping is thawed but still cold, and your cream cheese is softened so it blends easily.

In a medium mixing bowl, beat the softened cream cheese with an electric mixer on medium speed until smooth and creamy, about 1–2 minutes. Scrape down the sides of the bowl as needed so there are no lumps.

Cream cheese being mixed in a bowl with a hand mixer

Add the powdered sugar and vanilla extract to the cream cheese. Beat again until the mixture is smooth and slightly fluffy.

Spoon the key lime yogurt into the cream cheese mixture. If you like a sharper lime flavor, add the fresh lime juice and lime zest at this point. Beat on low speed just until everything is well combined and the color is a pale green.

Using a spatula, gently fold in the whipped topping until no streaks remain. Take your time and use light, sweeping motions so the mixture stays airy and creamy. This is your key lime filling.

Pale green key lime filling being folded in a mixing bowl

Place a single layer of graham crackers in the bottom of the glass baking dish, breaking pieces as needed to cover the bottom in a mostly even layer. It’s fine if there are small gaps; they’ll soften as it chills.

Spread about one-third of the key lime filling over the graham crackers, smoothing it into an even layer with the back of a spoon or an offset spatula. Make sure the crackers are completely covered.

Add a second layer of graham crackers over the filling, again breaking pieces to fit. Spread another one-third of the key lime filling over this layer, smoothing it out.

Icebox cake layers being assembled in a glass baking dish

Add a third and final layer of graham crackers, then spread the remaining key lime filling over the top. Smooth the surface as neatly as you can; this will be the part you see when you bring it to the table.

If you’d like, sprinkle a few crushed graham cracker crumbs and a pinch of lime zest over the top for a simple garnish. You can also lay a few very thin lime slices along one edge for a pretty touch.

Cover the dish tightly with plastic wrap or a fitted lid. Refrigerate for at least 4 hours, but overnight is best, to let the graham crackers soften and the flavors meld. The cake should slice cleanly when fully chilled.

Finished key lime icebox cake chilling with garnish on top

When ready to serve, remove from the refrigerator, uncover, and slice into squares while still cold. Use a flat spatula to lift out the pieces, showing off the creamy pale green layers and softened cracker sheets. Return any leftovers promptly to the refrigerator.

Variations & Tips

For a slightly lighter version, you can use reduced-fat graham crackers, light key lime yogurt, and light whipped topping; the texture stays nicely creamy, though it may be a bit softer. If you prefer a stronger lime flavor, increase the lime zest to 2 teaspoons and the lime juice to 2 tablespoons, tasting as you go so it doesn’t become too tart.

Individual key lime icebox cake servings in small glass jars

To add a touch of crunch, sprinkle toasted coconut or finely chopped toasted pecans over the top just before serving. For individual servings, layer the graham crackers and filling in small glass jars or parfait cups; they chill faster and make for easy transport to potlucks. If you can’t find key lime yogurt, use regular lime yogurt and add a little extra zest for brightness.

Food safety tips: keep the whipped topping and yogurt refrigerated until you’re ready to mix, and don’t let the finished dessert sit out at room temperature for more than 2 hours (or 1 hour if it’s quite warm) because of the dairy ingredients. Always use clean utensils for spreading and serving, and store leftovers tightly covered in the refrigerator, enjoying them within 3–4 days for best quality and safety.

Dollop this 1 savory mixture

by


 This is the kind of weeknight recipe I lean on when the day has been long but I still want dinner to feel a little special. These Southern-inspired ranch pork chops are all about one savory mixture—mayonnaise, a ranch seasoning packet, and grated Parmesan—that you simply dollop over raw pork chops on a baking sheet.

As it bakes, the mixture melts into a creamy, salty, lightly tangy crust that makes the meat taste like you fussed with marinades and pan sauces, when in reality it’s a straight shot from mixing bowl to oven. Ranch seasoning is a relatively modern American pantry staple, but it borrows from the buttermilk-and-herb flavors that run through a lot of Midwestern and Southern home cooking, which is probably why it feels so comforting here.

Baked ranch pork chops on a weeknight dinner plate

Serve these pork chops with something that can soak up the extra drippings from the pan—mashed potatoes, buttered egg noodles, or simple white rice all work beautifully. I like to add a green vegetable with some crunch to balance the richness: roasted green beans, a crisp salad with a sharp vinaigrette, or steamed broccoli tossed with lemon.

If you want to lean into a more Southern-style plate, pair the chops with skillet-fried potatoes, coleslaw, and a slice of cornbread. A light, citrusy white wine or unsweet iced tea rounds out the meal without competing with the ranch and Parmesan flavors.

Southern Ranch Baked Pork Chops

Servings: 4


Ingredients
4 boneless or bone-in pork chops, 1-inch thick (about 2 to 2 1/2 pounds total)
1/2 cup mayonnaise
1 (1-ounce) packet dry ranch seasoning mix
1/2 cup finely grated Parmesan cheese
1 tablespoon olive oil (for the baking sheet)
1/4 teaspoon freshly ground black pepper
1/4 teaspoon paprika (optional, for color)
Chopped fresh parsley, for garnish (optional)
Directions

Preheat your oven to 400°F (200°C). Lightly oil a rimmed baking sheet with the olive oil, spreading it with your fingers or a paper towel so the pork chops won’t stick.

Oiled baking sheet with pork chops ready for seasoning

Pat the pork chops dry with paper towels. Arrange them in a single layer on the prepared baking sheet, leaving a little space between each chop so they roast rather than steam.

Season the tops of the pork chops lightly with the black pepper. If using, sprinkle a pinch of paprika over each chop for a bit of color and mild warmth. The ranch seasoning and Parmesan are salty, so you don’t need to add extra salt.

In a small mixing bowl, combine the mayonnaise, ranch seasoning packet, and grated Parmesan cheese. Stir until the mixture is smooth and evenly blended; it should be thick and spreadable.

Ranch Parmesan topping being mixed in a small bowl

Using a spoon or small spatula, dollop the savory mayonnaise–ranch–Parmesan mixture onto the center of each raw pork chop. Use the back of the spoon to gently spread it over the top surface of each chop in an even layer, going almost to the edges but not over the sides.

This step should look like generous mounds of the mixture sitting on the pork chops on the baking sheet.

Place the baking sheet on the middle rack of the preheated oven. Bake for 18 to 25 minutes, depending on the thickness of your pork chops, until the topping is bubbly and lightly golden and the internal temperature of the pork reaches 145°F (63°C) when checked with an instant-read thermometer in the thickest part.

Baked pork chops with golden ranch Parmesan crust on sheet pan

If you’d like a deeper golden crust on top, switch the oven to broil for the last 1 to 2 minutes of cooking, watching closely so the topping doesn’t burn.

Remove the baking sheet from the oven and let the pork chops rest on the pan for 5 minutes. This helps the juices settle back into the meat. Sprinkle with chopped fresh parsley, if using, and serve the chops directly from the baking sheet with any flavorful drippings spooned over the top or over your side dishes.

Variations & Tips

Bone-in vs. boneless: Bone-in pork chops tend to stay juicier and have a bit more flavor, but boneless work just as well; just start checking them for doneness on the earlier side.

Thickness matters: For thinner chops (3/4 inch), start checking at 15 minutes; for very thick chops (1 1/2 inches), you may need up to 28 minutes.

Cheese swaps: Try half Parmesan and half grated Romano for a sharper bite, or use finely shredded cheddar for a slightly more melty, casserole-style topping.

Extra seasoning: Stir a pinch of cayenne or crushed red pepper flakes into the mixture if you like gentle heat, or add 1/2 teaspoon garlic powder for a more garlicky profile.

Ingredient variations for ranch pork chops on kitchen counter

Lighter version: Use light mayonnaise or a mix of half mayonnaise and half plain Greek yogurt; the topping will be a bit tangier and may brown slightly less, but the overall effect is similar.

One-pan meal: Scatter small, quick-cooking vegetables like halved green beans or thinly sliced bell peppers around the pork chops on the baking sheet, tossing them lightly with a drizzle of oil and a pinch of salt before baking.

Chicken option: This same dolloped mixture works well on boneless, skinless chicken breasts or thighs; adjust the cooking time so the chicken reaches 165°F (74°C).

Leftovers: Slice leftover chops and reheat gently in a covered skillet with a splash of water or stock, then tuck into sandwiches or serve over rice for an easy second-day meal.

Tuesday, May 26, 2026

Toss frozen pork potstickers

by


 This 4-ingredient slow cooker potsticker dish is my kind of Earth Day cooking: minimal fuss, minimal waste, and maximum comfort. We’re leaning on a bag of frozen pork potstickers and just three pantry-style additions to build a complete, shareable meal that tastes far more elaborate than it is.

Slow cooker potstickers served in broth

Potstickers, originally from northern China, are usually pan-fried, but here they simmer gently in a flavorful broth, soaking up sauce instead of oil. It’s a set-it-and-forget-it approach that lets you celebrate the day with friends while the slow cooker does the work—and yes, they will absolutely ask how you made something this good with so little effort.

Serve the potstickers in shallow bowls, ladling plenty of the savory broth and vegetables over the top. I like to pile on fresh garnishes if I have them—sliced green onions or a handful of cilantro—but they’re optional.

Pair this with steamed brown rice or quinoa to soak up the extra sauce, or a simple side of roasted or stir-fried vegetables for more color on the plate. A crisp green salad with a sesame or ginger vinaigrette also plays nicely with the flavors and keeps the whole meal feeling light but satisfying.

Styled serving suggestion with potstickers and sides

4-Ingredient Slow Cooker Potsticker Supper

Servings: 4


Ingredients

1 (24–32 ounce) bag frozen pork potstickers (about 18–24 pieces, unthawed)

3 cups low-sodium chicken or vegetable broth
2 cups frozen stir-fry vegetable blend
1/3 cup bottled teriyaki sauce (or soy-ginger stir-fry sauce)

Potsticker ingredients arranged on a kitchen counter

Directions

Place the frozen pork potstickers in an even layer on the bottom of a 4- to 6-quart slow cooker. It’s fine if they touch, but try not to stack them more than two layers deep so they cook evenly.

Pour the chicken or vegetable broth over the potstickers, making sure most of them are at least partially submerged. Gently nudge them with a spoon if needed so the broth can circulate.

Broth poured over frozen potstickers in slow cooker

Sprinkle the frozen stir-fry vegetables evenly over the top of the potstickers. There’s no need to thaw the vegetables first; they’ll release moisture and help create more flavorful cooking liquid.

Drizzle the teriyaki sauce over the vegetables and potstickers. Do not stir; leaving everything mostly undisturbed helps the potstickers hold their shape instead of falling apart.

Cover the slow cooker with the lid and cook on LOW for 3 to 4 hours, or on HIGH for 1½ to 2 hours. The potstickers are done when they’re piping hot in the center (at least 165°F/74°C) and the vegetables are tender.

Vegetables and sauce layered over potstickers before cooking

Once cooked, taste the broth and add a splash more teriyaki sauce or a pinch of salt if you’d like a stronger flavor. Gently lift the potstickers out with a slotted spoon to keep them intact, then spoon the vegetables and broth over the top for serving.

Variations & Tips

For a spicier version, add 1 to 2 tablespoons of chili-garlic sauce or sriracha along with the teriyaki. If you prefer a slightly thicker, more glazed sauce, whisk 1 tablespoon of cornstarch into 2 tablespoons of cold water and stir it into the slow cooker during the last 20 minutes of cooking on HIGH.

Finished potstickers being lifted from broth

You can easily turn this into a more vegetable-forward Earth Day meal by increasing the frozen vegetable blend to 3 cups or by adding sliced mushrooms or shredded cabbage on top of the potstickers before cooking. For a different flavor profile, swap the teriyaki for a bottled Korean BBQ or gochujang sauce, keeping the same quantity.

If sodium is a concern, choose low-sodium broth and a reduced-sodium sauce, and taste before adding any extra seasoning.

Food safety notes: Always add the potstickers to the slow cooker fully frozen; do not thaw them at room temperature, as that increases the risk of bacterial growth. Make sure the dish reaches at least 165°F/74°C in the center of several potstickers before serving. Do not leave cooked potstickers at room temperature for more than 2 hours (1 hour if your kitchen is very warm). Cool leftovers quickly, store them in the refrigerator within 2 hours, and eat within 3 to 4 days, reheating until steaming hot before serving again.

Leftover potstickers stored in meal-prep containers

Friday, May 22, 2026

Pre-Summer Feast

by


 This little slow cooker farfalle dish is the kind of comfort I lean on when the days turn warm but I still want something cozy by suppertime. It reminds me of the baked casseroles my mother used to make on the farm, with that golden, bubbling top and a soft, almost custardy middle, but here the crockpot does all the work while you’re out in the garden or running errands.

Slow cooker farfalle with a golden cheesy top

Using just five pantry-friendly ingredients, the dry farfalle slowly soaks up a creamy, savory sauce and settles into a dense, spoonable mass with rich, baked-in flavor—very much in the spirit of Midwestern hotdishes, just adapted for those busy pre-summer afternoons.

Spoon this farfalle comfort straight from the slow cooker into warm bowls, and pair it with something bright and crisp to balance the richness—maybe a simple lettuce salad with a tangy vinaigrette or sliced garden tomatoes with a sprinkle of salt. Buttered green beans or steamed broccoli also sit nicely alongside.

Bowl of creamy farfalle beside a fresh salad

A slice of crusty bread or a soft dinner roll is handy for catching the creamy sauce around the edges. Unsweet iced tea or lemonade keeps it feeling light enough for a warm day, even though the dish itself is wonderfully hearty.

5-Ingredient Slow Cooker Farfalle Comfort

Servings: 6


Ingredients
12 oz dry farfalle pasta
3 cups low-sodium chicken broth
10.5 oz can condensed cream of mushroom soup
2 cups shredded mozzarella cheese, divided
1 tsp garlic powder
Directions
Lightly grease the inside of a 4- to 6-quart slow cooker with a bit of oil or butter to help prevent sticking and make cleanup easier.
Pour the dry farfalle pasta into the slow cooker and spread it into an even layer so it cooks as uniformly as possible.
Dry farfalle pasta spread in a slow cooker
In a medium bowl, whisk together the chicken broth, condensed cream of mushroom soup, and garlic powder until the mixture is smooth and no big lumps of soup remain.
Pour the soup and broth mixture evenly over the dry farfalle in the slow cooker, pressing down gently with a spoon so most of the pasta is submerged in liquid. It is fine if a few pieces poke above the surface; they will soften as they steam.
Creamy broth mixture being poured over farfalle
Sprinkle 1 1/2 cups of the shredded mozzarella over the top of the pasta and liquid, leaving the remaining 1/2 cup cheese for later to build a deep, golden crust.
Cover the slow cooker with its lid and cook on HIGH for 1 1/2 to 2 hours, or until the farfalle is just tender when you bite into a piece. Avoid lifting the lid during the first 60 minutes so the heat and steam can build properly.
Once the pasta is tender and the mixture has thickened into a dense, creamy mass, gently stir from the edges toward the center to pull some of the melted cheese and thicker sauce down into the pasta. Smooth the top again with the back of a spoon.
Creamy farfalle being smoothed in the slow cooker
Sprinkle the remaining 1/2 cup mozzarella evenly over the surface. Replace the lid slightly askew (propped open just a crack with a wooden spoon handle if needed) and continue cooking on HIGH for 15 to 30 minutes. This allows steam to escape so the top layer of cheese can tighten, bubble, and take on a rich golden-brown color, forming a dense, slightly gelatinous crust over the pasta.
Once the top is bubbling and golden-brown in spots and the pasta underneath is thick and spoonable, turn the slow cooker to WARM. Let the dish rest, covered, for about 10 minutes to set up before serving. This rest helps the sauce cling to the farfalle and gives that comforting, casserole-like texture.
Golden brown farfalle crust in the slow cooker
Serve the farfalle straight from the slow cooker, scooping down through the golden top so each portion gets some of the browned, cheesy crust and the creamy pasta beneath.
Variations & Tips

For a vegetarian version, use vegetable broth instead of chicken broth and a vegetarian condensed cream soup if you can find it. If you prefer a deeper, more pronounced umami flavor, you can substitute cream of mushroom with cream of chicken or cream of celery soup—still keeping the total ingredient list to five. For a smokier taste that reminds me of church potlucks, use smoked mozzarella or a blend of mozzarella and provolone for the topping.

Small bowls of soup and cheeses for recipe variations

You can also swap in another short, sturdy pasta like penne or rotini, but cooking time may vary slightly; start checking at the 1 1/4-hour mark. To keep the dish from becoming mushy, resist the urge to add extra liquid at the start; the pasta will release starch as it cooks, thickening the sauce into that dense, spoonable consistency. Stir gently so the farfalle holds its shape.

Food safety tips: Make sure your slow cooker starts from a hot setting—use HIGH as directed so the dish passes through the food “danger zone” (40°F–140°F) quickly. Do not leave the cooked pasta on the WARM setting for more than 2 hours. Cool leftovers promptly and refrigerate in shallow containers; reheat thoroughly until steaming hot before serving again.

I just bought this ground beef

by


 Have you ever purchased a package of ground beef that looked perfectly red and fresh on the outside, only to find that the inside is a dull grey color when you break it open? If so, you might be wondering if the store has sold you old or spoiled meat. This common occurrence can be alarming, leading to questions about food safety and quality.

Before jumping to conclusions about being scammed, it's important to understand the natural processes that affect the color of ground beef. While it might look unappetizing, grey ground beef is not always a cause for concern. In this article, we will explore why ground beef can turn grey inside, when it is safe to eat, and how to ensure you are purchasing fresh meat.
1. Why Fresh Ground Beef Turns Brown Or Grey Inside
Ground beef can change color due to a variety of factors, primarily the exposure to oxygen and the oxidation of myoglobin, a protein found in meat. Freshly ground beef is typically bright red on the outside because it has been exposed to oxygen, which reacts with myoglobin to form oxymyoglobin, a pigment that gives meat its red color.
However, the inside of the meat may not have the same exposure to oxygen. Without this exposure, the myoglobin inside the meat can remain in a reduced state, which is naturally more grey or brown. This color change is a normal and harmless process that occurs as part of the meat's natural aging.
2. The Science Of Oxygen, Myoglobin, And Meat Color
The color of meat is largely determined by myoglobin, a protein that stores oxygen in muscle cells. In the presence of oxygen, myoglobin forms oxymyoglobin, which is bright red. However, when oxygen levels are limited, such as in the interior of a tightly packed package of ground beef, myoglobin can convert to metmyoglobin, which has a brown or grey hue.
This transformation is purely a chemical reaction and does not indicate spoilage. It is important to note that the red color of meat is not always a reliable indicator of freshness or quality. In fact, some stores use modified atmosphere packaging to maintain the red color for longer periods, even when the meat is not as fresh.
3. When Grey Ground Beef Is Perfectly Safe To Eat
Grey ground beef can still be safe to eat if it has been stored properly and does not exhibit other signs of spoilage. The key factors to consider are the smell and texture of the meat. If the beef smells fresh and the texture is firm, it is likely safe for consumption, regardless of its color.
The United States Department of Agriculture (USDA) states that ground beef can be safely consumed up to two days after purchase when stored in the refrigerator, or three to four months if frozen. If the beef passes the smell and texture tests, it should be safe to cook and eat.
4. Red On The Outside, Grey In The Middle: Is This A Scam?
It’s understandable to feel wary when you encounter ground beef that is red on the outside and grey on the inside, but this is typically not a scam. This color disparity is a natural result of the meat's exposure to oxygen. When ground beef is packaged, the outer layer is exposed to air, allowing it to develop the characteristic red color, while the inner portions remain deprived of oxygen, hence the grey color.
Stores are not intentionally trying to deceive customers; rather, they are working within the constraints of how meat naturally reacts to air exposure. As long as the meat has been stored correctly and does not show other signs of spoilage, it should be safe to eat.
5. Color Versus Smell And Texture: What Really Signals Spoilage
While the color of ground beef can be an initial indicator of its condition, it is not the most reliable measure of spoilage. The most telling signs of spoiled meat are its smell and texture. Spoiled beef will have a sour or off-putting odor and may feel slimy or sticky to the touch.
Always trust your senses when evaluating meat. If the beef has an unusual smell or feels different than fresh meat should, it's best to err on the side of caution and discard it. Remember, when in doubt, throw it out.
6. How Long Ground Beef Can Safely Sit In Your Fridge
According to the USDA, raw ground beef should be cooked or frozen within two days of purchase. This short time frame is due to the high surface area exposed in ground meat, which can harbor bacteria more easily than whole cuts.
If you do not plan to use the ground beef within this time frame, it is best to freeze it to ensure safety and quality. Properly stored, ground beef can last in the freezer for up to four months, retaining its quality.
7. Smart Ways To Check Ground Beef In The Store Before You Buy
When purchasing ground beef, look for packages that are cold to the touch and have a consistent color throughout, though some color variations are normal. Check the packaging for any tears or leaks, as this can introduce bacteria.
Pay attention to the sell-by date and choose packages with the latest dates to ensure maximum freshness. If possible, opt for vacuum-sealed packages, as these help preserve freshness and color by limiting oxygen exposure.
8. Decoding Labels, Sell-By Dates, And Packaging Types
Understanding labels and sell-by dates can help you make informed decisions when buying meat. The sell-by date is the last day the store recommends selling the product, but it does not necessarily mean the meat is unsafe to consume after this date.
Packaging types also play a role in meat preservation. Vacuum-sealed and modified atmosphere packaging can extend the shelf life by reducing oxygen exposure. Always check for any signs of damage in the packaging before purchasing.
9. When Grey Beef Is A Red Flag: Signs You Should Toss It
While grey beef is often safe, there are instances when it should be discarded. If the meat has a strong, unpleasant odor, feels sticky or slimy, or if the package is bulging or damaged, these are signs of spoilage.
Additionally, if the beef has been stored beyond the recommended time frame in the refrigerator or has been left out at room temperature for more than two hours, it is best to throw it out to prevent the risk of foodborne illness.
10. What To Do If You Think The Store Sold You Bad Meat
If you suspect that you have been sold spoiled meat, you should first contact the store to report the issue. Many stores have return or refund policies for perishable items, and they may offer a replacement or a refund.
Providing feedback can also help the store improve its quality control measures. Keep the receipt and the packaging if possible, as these may be required for a refund or exchange.
11. How To Store And Freeze Ground Beef To Keep It Safe And Red Longer
To extend the shelf life of ground beef, it should be stored in the coldest part of the refrigerator and used within two days. If you plan to keep it longer, wrap it tightly in plastic wrap or place it in a freezer-safe bag before freezing.
When freezing, try to remove as much air as possible from the packaging to prevent freezer burn and preserve the meat's color and quality. Label the package with the date to keep track of its storage time, and use it within three to four months for the best quality.

Top Ad 728x90