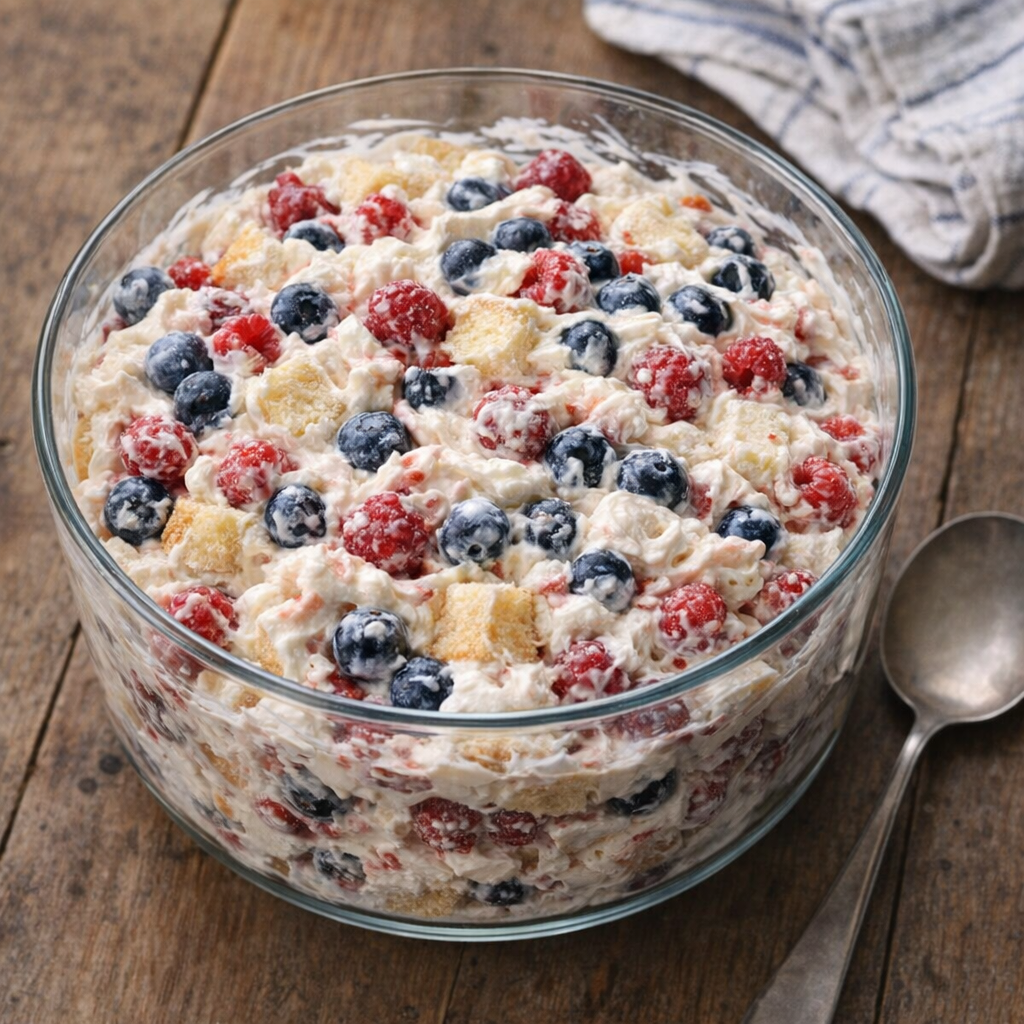
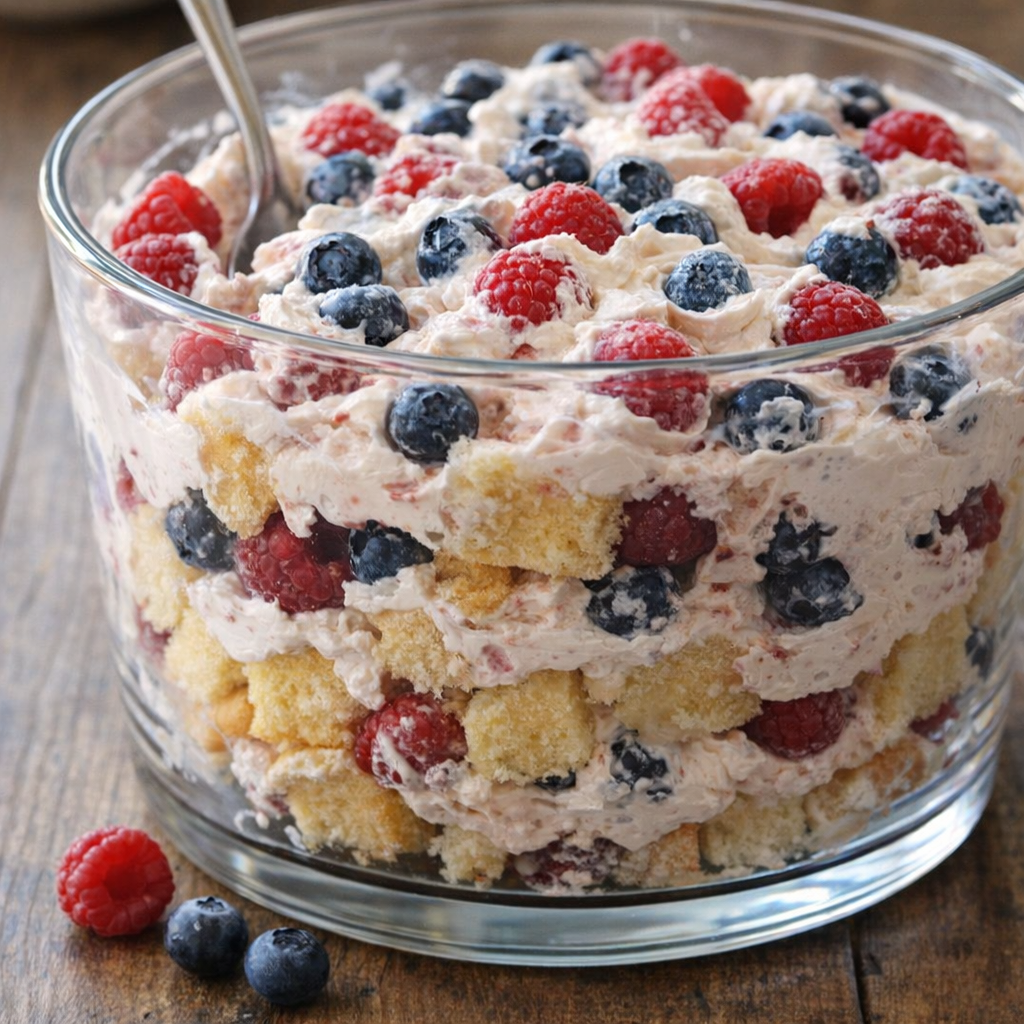
This Patriotic Berry Trifle is the kind of dessert my grandma would pull together whenever we had a long weekend gathering and folks were already crowding the kitchen. It’s not fussy or fancy, and it never did slice into perfect layers, but that soft, creamy mess of pound cake, whipped cream, and berries always disappeared first.
Rustic berry trifle in a glass dish on a kitchen table
The recipe leans on a store-bought pound cake and a big bowl of lightly sweetened whipped cream, then folds in blueberries and raspberries so every spoonful is rich, smooth, and dotted with bright, juicy bits. It looks a little rumpled in the dish, but it tastes like summer, family, and second helpings.
Serve this trifle well-chilled in a clear glass dish so everyone can see the swirls of cream and the red and blue berries peeking through. It pairs nicely with grilled burgers or brats, corn on the cob, and simple picnic salads, and it’s especially welcome after a salty, smoky cookout. Offer small bowls and a big serving spoon so folks can help themselves. A pot of coffee or a pitcher of iced tea on the side, maybe with a squeeze of lemon, is all you need to round out the table.
Patriotic Berry Trifle
Servings: 8-10
Ingredients
1 (16-ounce) store-bought pound cake, chilled
2 cups fresh blueberries, rinsed and patted dry
2 cups fresh raspberries, rinsed and patted dry
2 cups heavy whipping cream, well chilled
1/3 cup powdered sugar
1 teaspoon vanilla extract
1 tablespoon lemon juice (optional, brightens the berries)
1 tablespoon granulated sugar (optional, for tossing berries if they are tart)
Pinch of salt
Directions
Chill a medium or large glass mixing bowl and the beaters of your hand mixer (or the bowl of a stand mixer) in the refrigerator for at least 15 minutes so the cream will whip up nicely.
Chilled mixing bowl and fresh berries ready on the counter
Rinse the blueberries and raspberries gently under cool water, then spread them out on a clean kitchen towel or paper towels and pat them completely dry. Excess water will make the trifle runny.
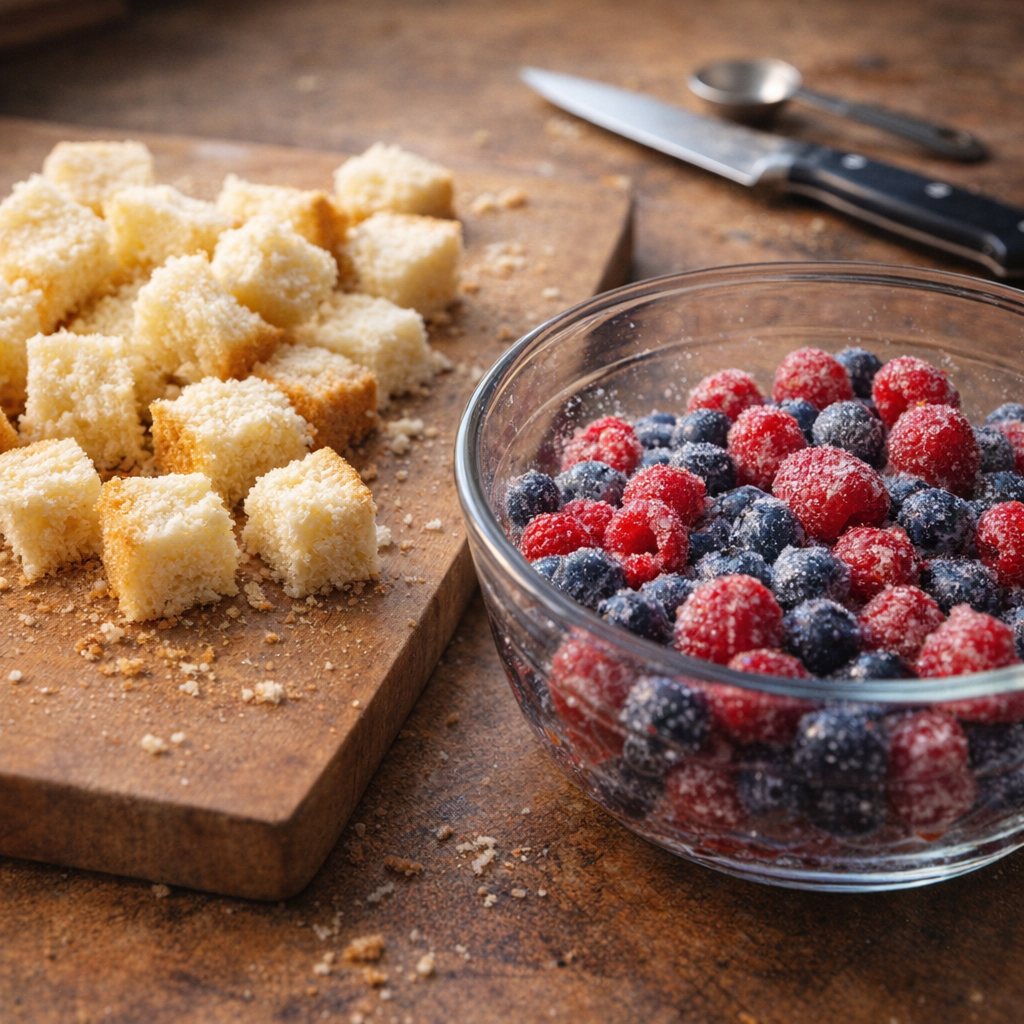
If your berries are on the tart side, place them in a bowl, sprinkle with the lemon juice and the granulated sugar, and toss gently. Let them sit for about 10 minutes while you prepare the rest of the dessert so they can release a little juice and soften.
Cut the chilled pound cake into bite-sized cubes, about 3/4-inch to 1-inch in size. They don’t have to be perfect; a mix of sizes gives the trifle that cozy, rustic look.
Cubed pound cake and sugared berries on a farmhouse counter
Remove the chilled mixing bowl and beaters from the refrigerator. Pour in the heavy whipping cream, add the powdered sugar, vanilla extract, and a pinch of salt.
Beat the cream mixture on medium-high speed until soft peaks form and the cream is thick and billowy. Stop and scrape down the sides of the bowl once or twice so everything whips evenly. Be careful not to overbeat into butter; the cream should be smooth and soft-set.
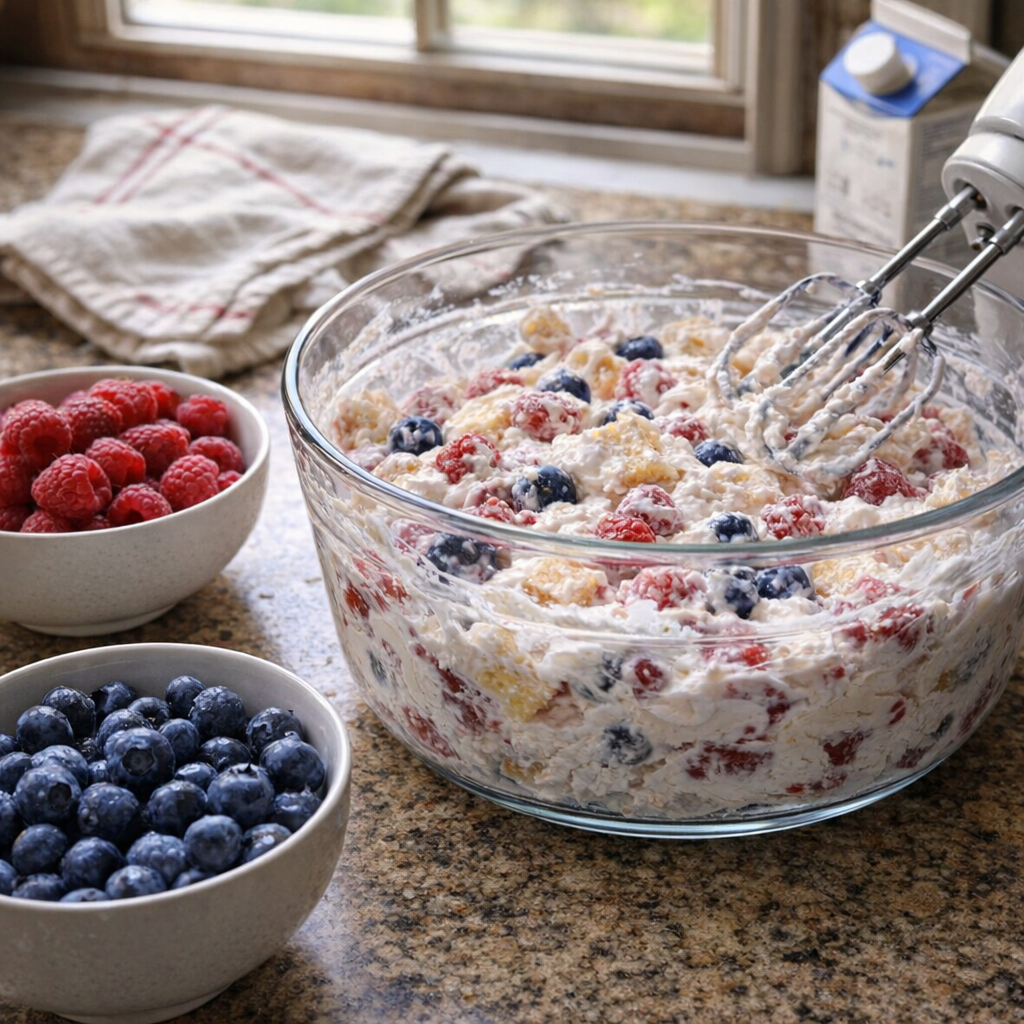
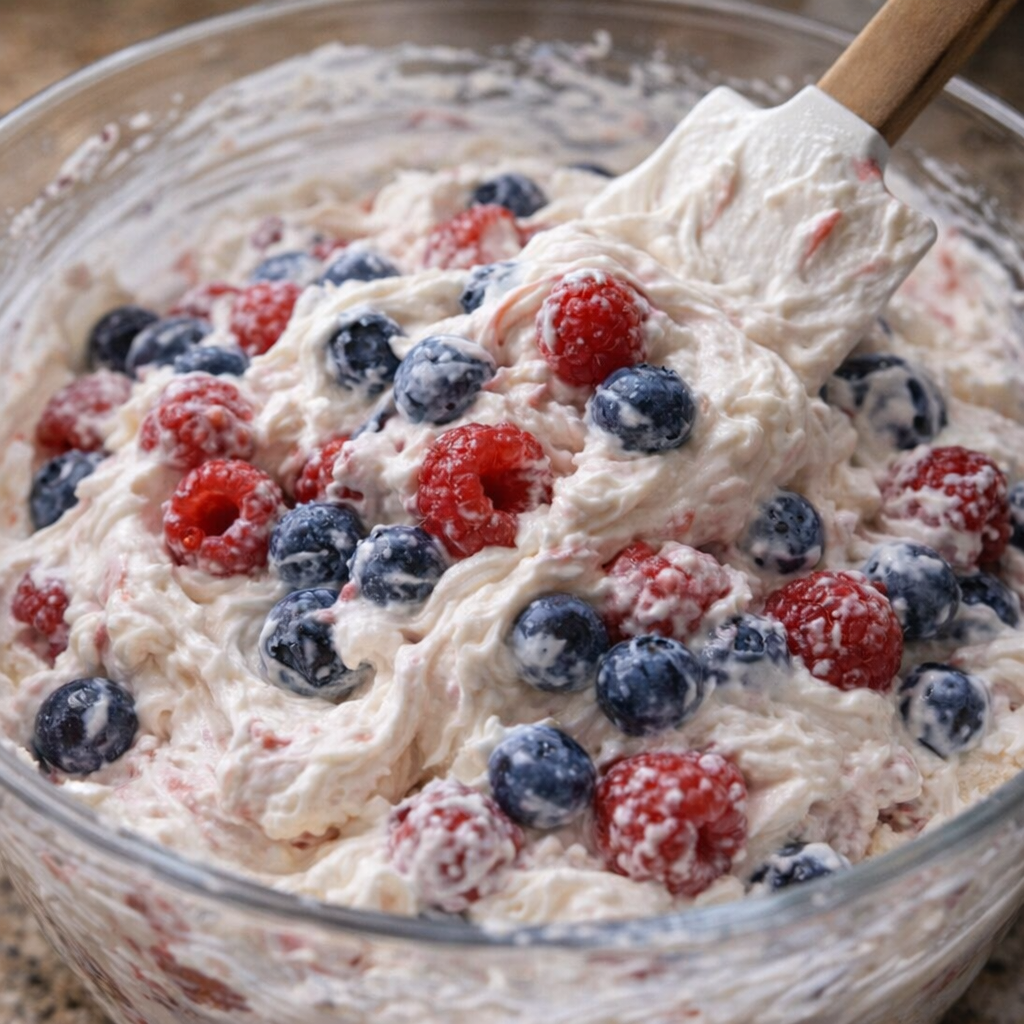
Set aside a small handful of the prettiest blueberries and raspberries for the top garnish. Gently fold the remaining berries into the whipped cream with a spatula, turning the bowl as you go. You want an uneven mix so there are streaks of white cream and pockets of bright berries rather than a perfectly uniform mixture.
Berry-studded whipped cream being folded in a glass bowl
In a clear glass trifle bowl or a medium glass baking dish, scatter a loose layer of pound cake cubes across the bottom. Spoon some of the berry-studded whipped cream over the cake, letting it fall into the gaps and spread out in soft swirls. Don’t worry about making perfect layers; part of the charm is that it looks a little messy.
Continue to add layers of pound cake and berry whipped cream, loosely alternating until you’ve used everything. Gently press down here and there with the back of the spoon to settle the cake into the cream, but avoid packing it tightly. You want a soft, spoonable dessert.
Mid-assembly trifle with visible layers in a clear glass bowl
Scatter the reserved blueberries and raspberries over the top, tucking a few into the cream so the red and blue peek through. The surface should look rustic, with uneven swirls of cream and colorful bits folded in.
Cover the dish loosely with plastic wrap and refrigerate for at least 2 hours, or up to 6 hours, before serving. This resting time lets the pound cake soak up some of the cream and berry juices so the trifle becomes soft-set and spoonable without being soupy.
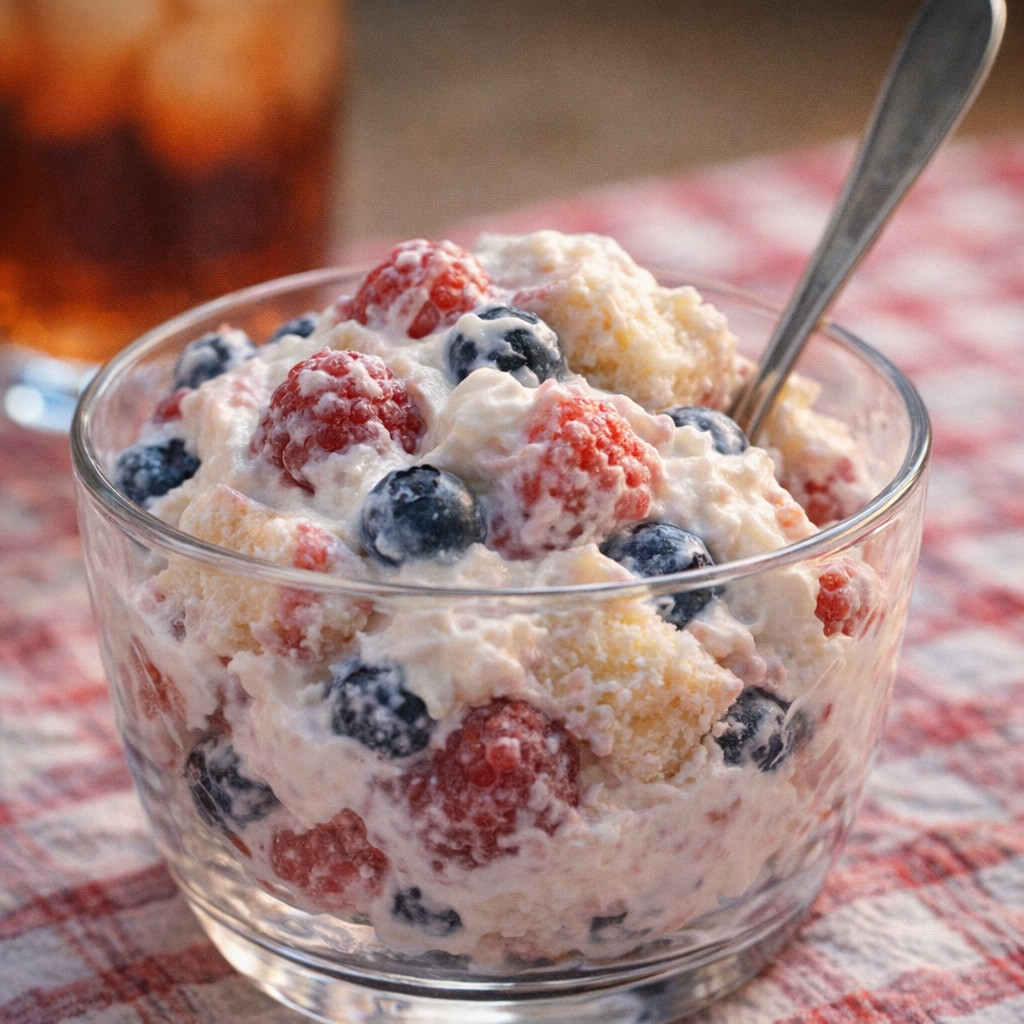
When ready to serve, remove from the refrigerator, peel off the plastic wrap, and bring the dish right to the table. Use a large spoon to scoop generous portions into small bowls, making sure each serving has some cake, cream, and berries. Store any leftovers covered in the refrigerator and enjoy within 1–2 days.
Variations & Tips
For a slightly lighter version, you can replace half of the heavy cream with chilled sour cream or plain Greek yogurt, folding them together gently so the mixture stays soft and creamy.
If you prefer a stronger vanilla flavor, add an extra 1/2 teaspoon of vanilla extract or use vanilla bean paste. To lean into the patriotic theme even more, you can add sliced strawberries along with the raspberries for extra red color. A lemon twist is lovely: add 1 teaspoon of finely grated lemon zest to the whipped cream and skip the optional lemon juice on the berries. If you like a hint of almond, add 1/4 teaspoon almond extract to the cream in place of some of the vanilla.
Served bowl of berry trifle with a spoon ready to eat
For a make-do pantry version, frozen berries can be used in a pinch—thaw them in a colander set over a bowl, pat them as dry as possible, and fold in gently, knowing the trifle will be a bit looser and more marbled. For adults, you can sprinkle a tablespoon or two of orange liqueur or raspberry liqueur over the pound cake cubes before layering, but keep this away from children and clearly label it if you do.
Food safety tips: Always keep the heavy cream refrigerated until just before whipping, and don’t leave the finished trifle at room temperature for more than 2 hours (or 1 hour if it’s a very hot day), since it contains dairy and fresh fruit. Wash and dry the berries thoroughly, discarding any that are moldy or overly soft. Store leftovers tightly covered in the refrigerator and enjoy within 1–2 days; if the cream starts to separate or the berries ferment or smell off, discard the rest rather than tasting. If you are serving to someone with egg or dairy allergies, be aware that many store-bought pound cakes contain both; read labels carefully and substitute an appropriate dairy-free cake and whipped topping if needed.
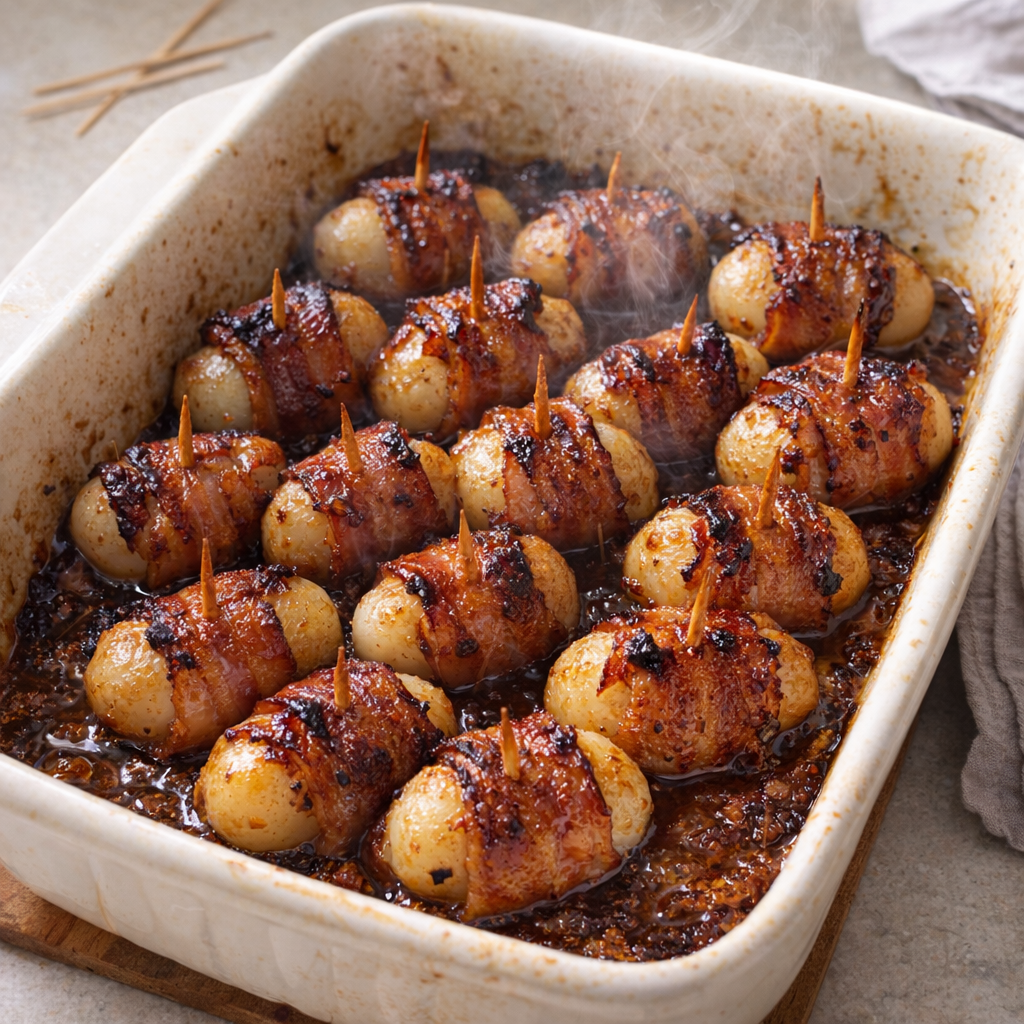
This low carb 4-ingredient bacon wrapped water chestnut recipe is one of those old-school party bites that never goes out of style. My dad’s coworker passed it along decades ago, and it’s been showing up at game days, church potlucks, and holiday spreads ever since.
The magic is in the contrast: crisp, smoky bacon wrapped around a cool, crunchy water chestnut, all glazed in a simple, savory-sweet sauce that caramelizes in the oven. It’s the kind of snack people hover around the casserole dish for, waiting to grab that perfect crunchy piece before it’s gone.
Bacon wrapped water chestnuts fresh from the oven in a casserole dish
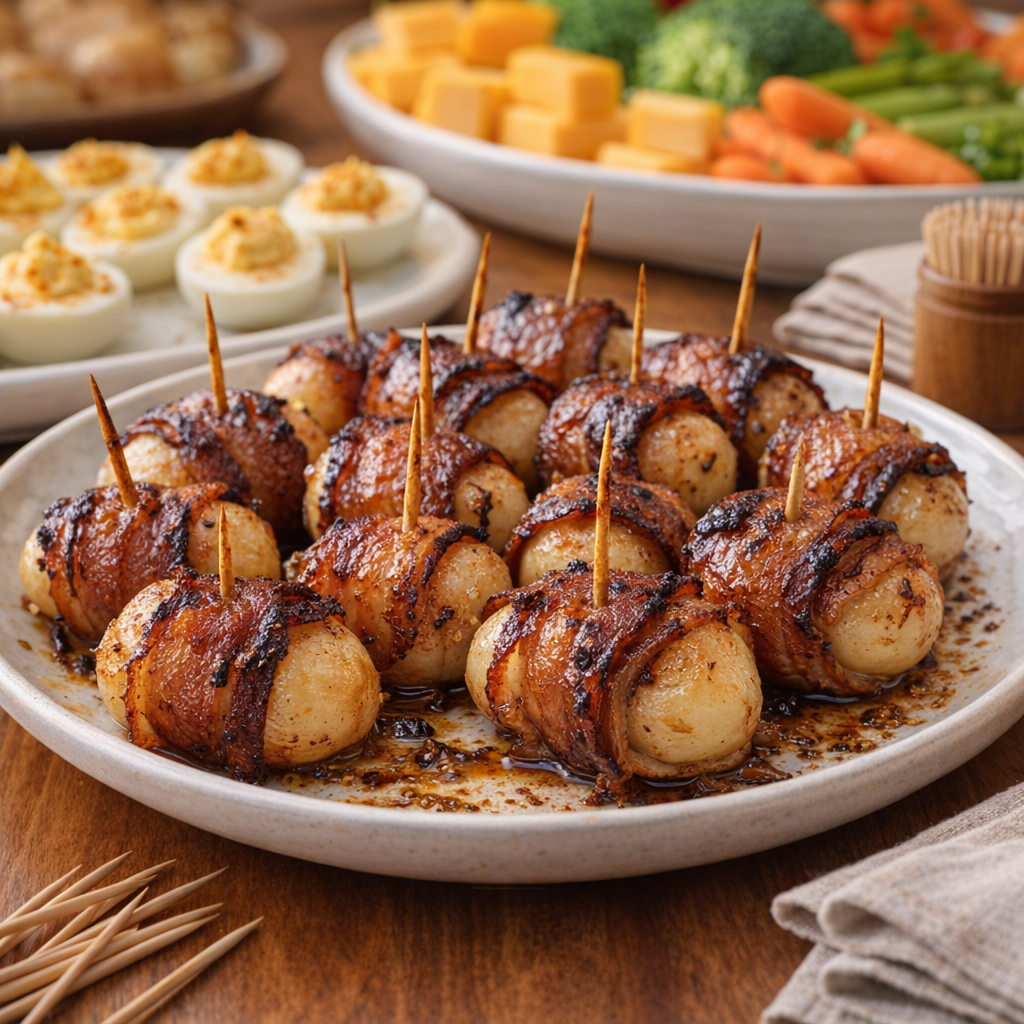
Serve these bacon wrapped water chestnuts right in the ceramic casserole dish you baked them in, so they stay warm and keep that glossy, caramelized look. They’re perfect alongside a veggie tray with ranch dip, a simple green salad, or other low-carb nibbles like deviled eggs and cheese cubes.
Set out a small bowl for the used toothpicks and some napkins, and if you want to make it more of a meal, pair them with a big pot of chili or a pan of roasted vegetables so everyone can build their own hearty plate.
Low Carb Bacon Wrapped Water Chestnuts
Servings: 8
Ingredients
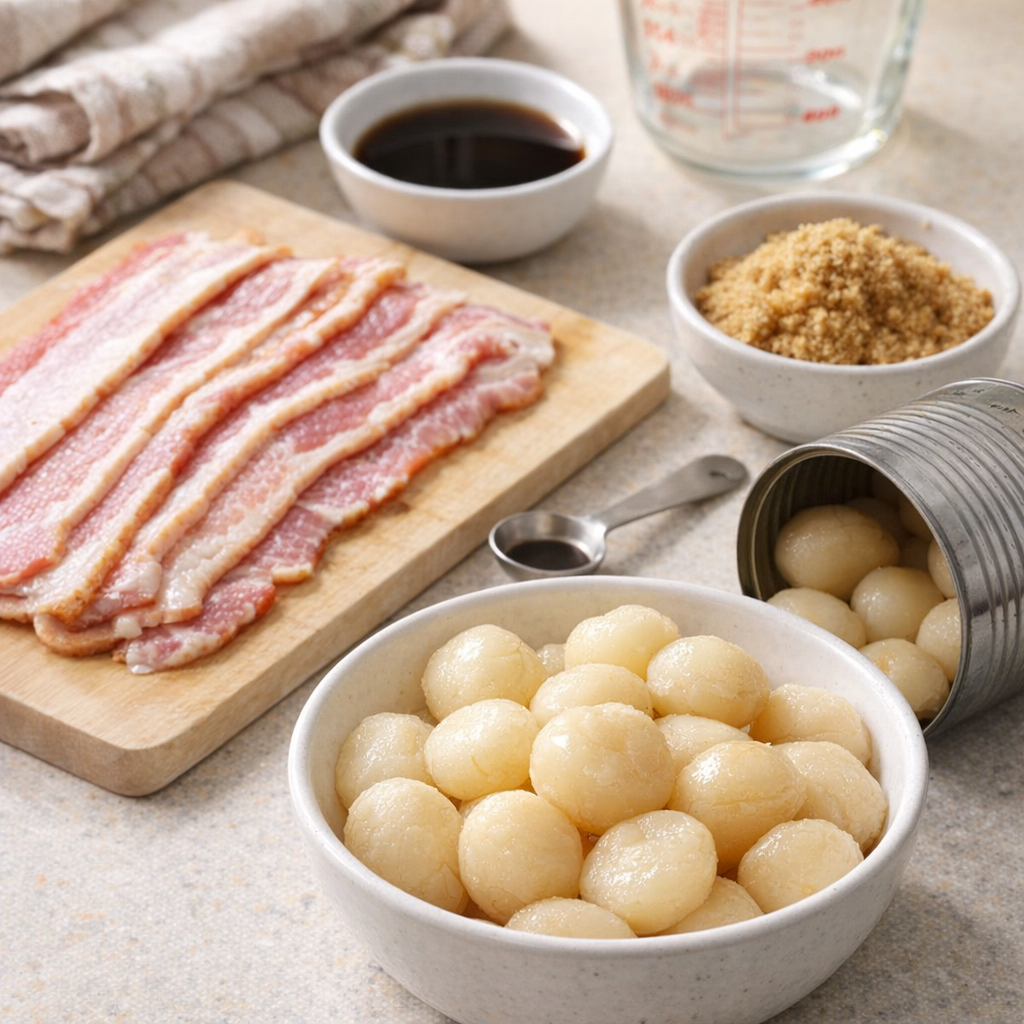
2 (8-ounce) cans whole water chestnuts, drained and patted dry
1 pound thin-sliced bacon, cut into thirds
1/3 cup soy sauce or coconut aminos
1/3 cup low-carb brown sugar substitute (such as brown-style erythritol or allulose)
Simple ingredients for bacon wrapped water chestnuts arranged on a kitchen counter
Directions
Preheat your oven to 375°F (190°C). Lightly grease a ceramic casserole dish large enough to hold the bacon-wrapped water chestnuts in a single layer.
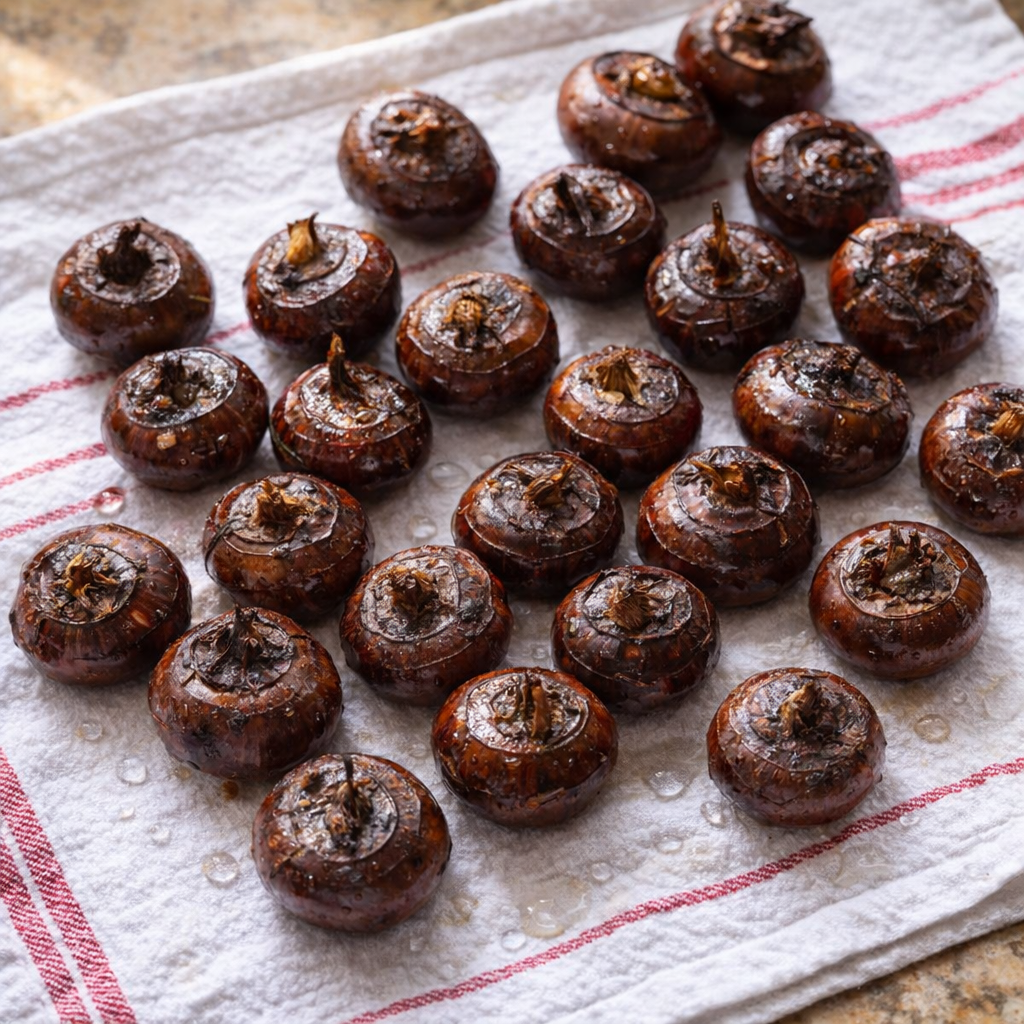
Drain the water chestnuts well and spread them on a clean kitchen towel or paper towels. Pat completely dry. This helps the bacon crisp and the glaze stick instead of steaming.
Water chestnuts drying on a kitchen towel before wrapping
In a small bowl, stir together the soy sauce (or coconut aminos) and the low-carb brown sugar substitute until the sweetener is mostly dissolved. It will thicken more as it bakes, so don’t worry if it’s not perfectly smooth.
Cut the bacon slices into thirds so each piece is just long enough to wrap once around a water chestnut. If your bacon is very wide, you can trim it slightly so it doesn’t overlap too much.
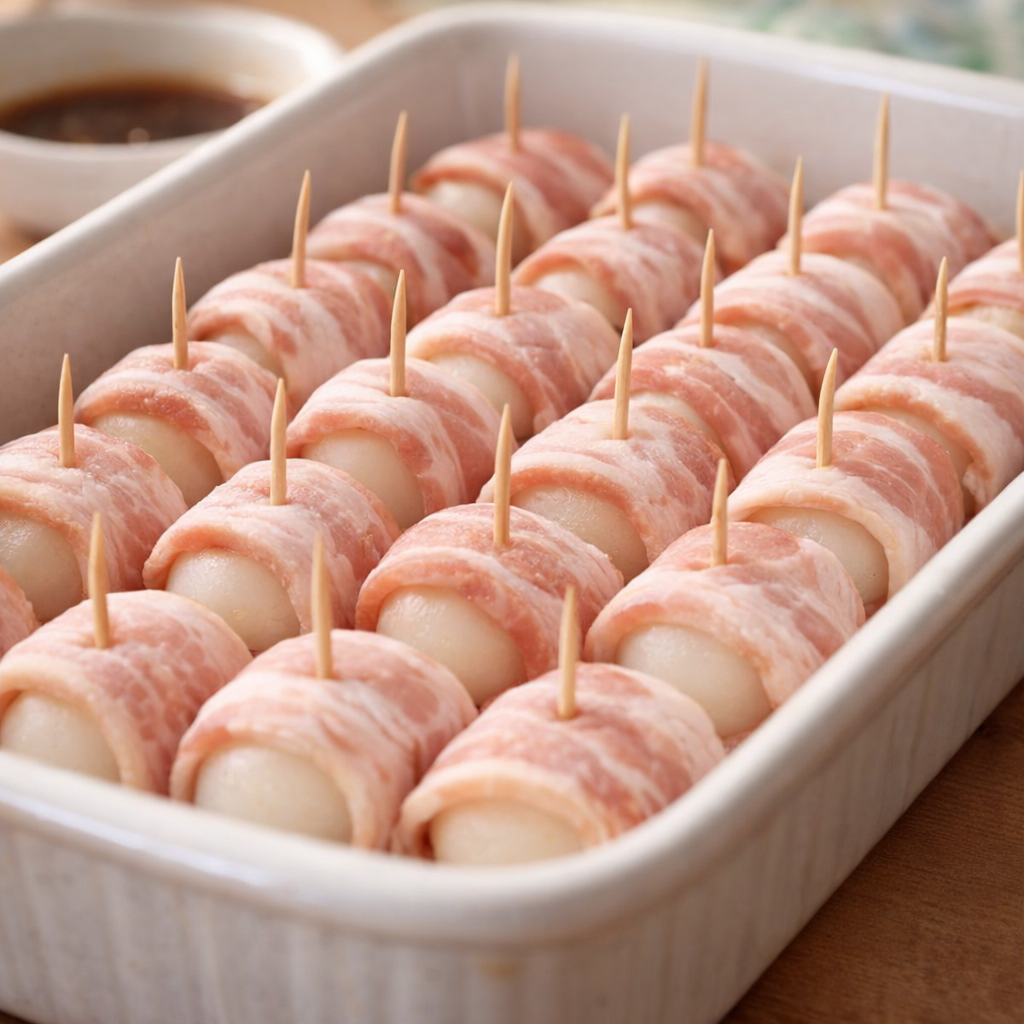
Wrap each water chestnut with a piece of bacon, pulling it snug so it holds its shape. Secure the bacon with a toothpick pushed all the way through the center. Place each piece in the prepared casserole dish, toothpick side up, leaving a little space between them so the bacon can crisp.
Bacon wrapped water chestnuts assembled in a casserole dish before baking
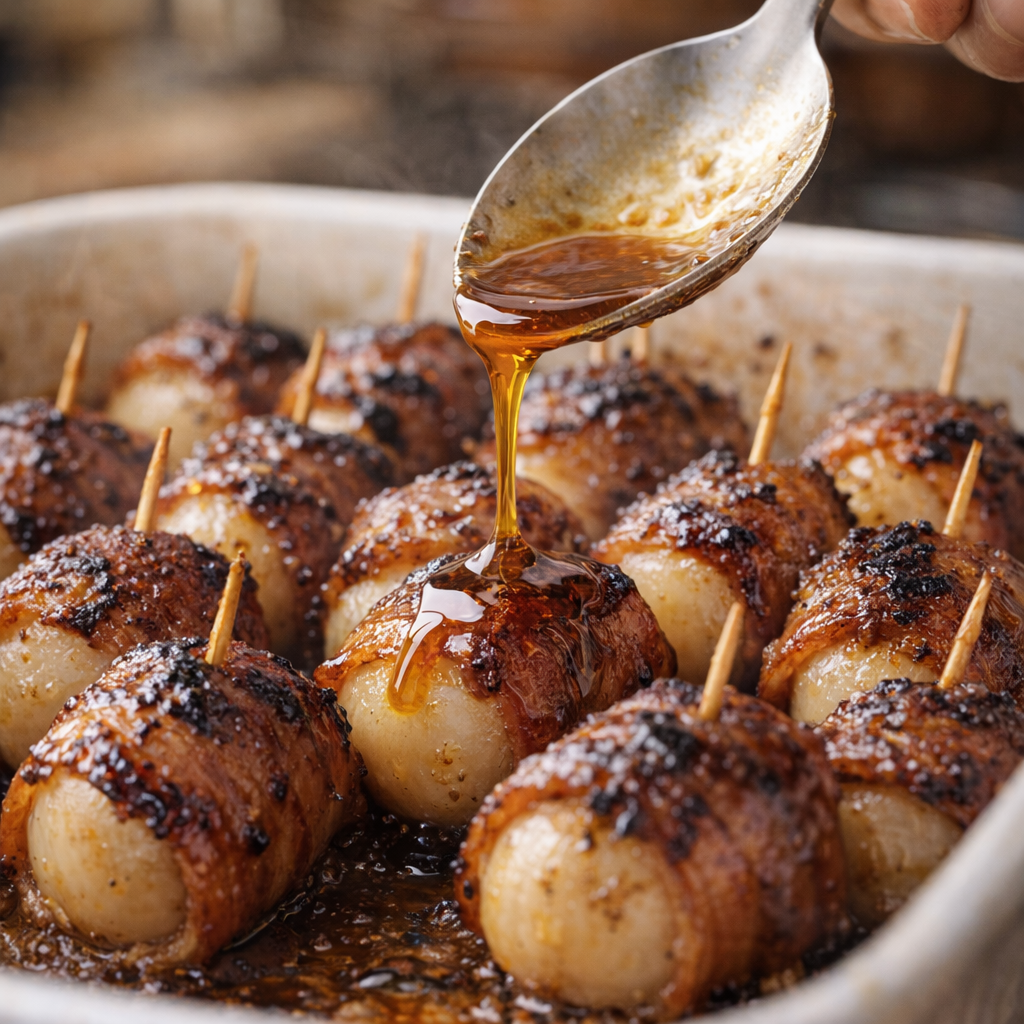
Give the glaze a quick stir, then spoon or brush it evenly over the tops and sides of the bacon-wrapped water chestnuts. Try to coat each piece so the bacon will caramelize nicely in the oven.
Bake uncovered for 35–45 minutes, turning the pieces once halfway through and spooning some of the rendered fat and glaze from the bottom of the dish back over the tops. They’re done when the bacon is deep golden brown, edges are slightly charred, and the glaze is bubbly and caramelized.
Glaze being spooned over bacon wrapped water chestnuts
Carefully remove the casserole dish from the oven and let the bacon wrapped water chestnuts rest for about 5–10 minutes. The glaze will thicken as it cools slightly, and the bacon will crisp up even more.
Serve warm straight from the dish, making sure everyone has access to that perfect crunchy piece they’ll be fighting over.
Variations & Tips
You can easily tweak this old coworker recipe to fit your crew’s tastes while keeping it to just four ingredients. For a smokier bite, use smoked bacon or add a few drops of liquid smoke directly to the soy sauce before mixing in the low-carb sweetener. If you prefer a touch more heat, choose a spicy or peppered bacon, or stir a pinch of red pepper flakes into the glaze (this still counts as part of your soy sauce/sweetener mixture, so you’re not really adding another standalone ingredient).
Family-style serving plate of bacon wrapped water chestnuts with simple low-carb sides
For a milder, kid-friendly version, use regular bacon and coconut aminos for a slightly sweeter, less salty flavor. If you need to avoid soy, stick with coconut aminos and taste as you go, since it’s naturally sweeter and less salty than soy sauce. To keep this appetizer as low carb as possible, choose a brown sugar substitute that’s labeled zero or very low net carbs and avoid using honey, maple syrup, or regular brown sugar.
You can also par-bake the bacon-wrapped water chestnuts for 10–15 minutes before adding the glaze if you like your bacon extra crisp. Food safety tips: Always keep raw bacon refrigerated until you’re ready to assemble, and wash your hands, cutting boards, and knives well after handling it. Make sure the bacon is cooked through and sizzling before serving; the high oven temperature will take care of this if you bake until the bacon is deeply browned and crisp.
If you’re preparing these ahead, assemble and refrigerate the wrapped water chestnuts (covered) for up to 24 hours, then add the glaze and bake just before serving. Leftovers should be cooled, covered, and refrigerated within 2 hours, and reheated in a hot oven or air fryer until steaming and sizzling before eating.
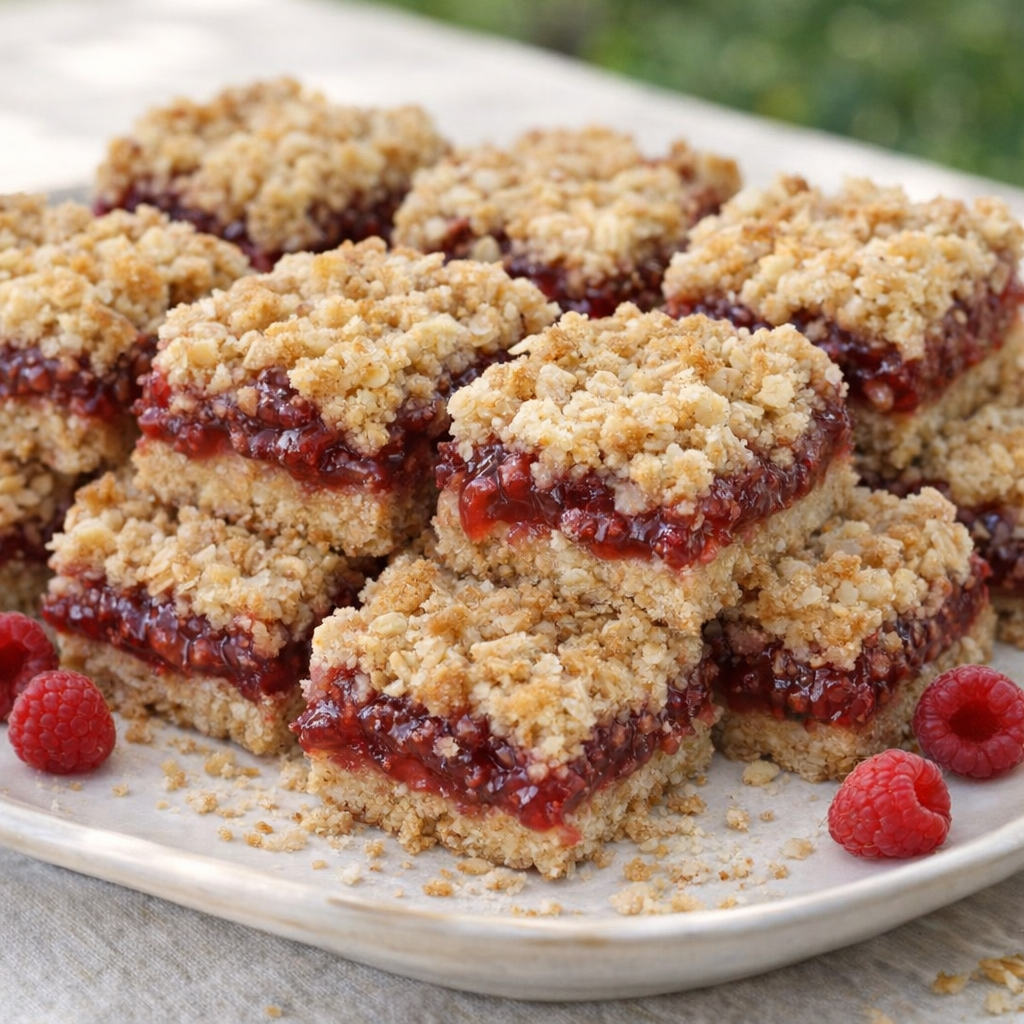
These 3-ingredient raspberry oat bars are adapted from my Grandma Helen, who truly did whip them up whenever someone dropped by unannounced. She kept a box of oatmeal cookie mix, a stick or two of butter, and a jar of raspberry preserves in the pantry at all times, and within half an hour there would be a pan of warm, jammy bars on the counter. I now make the same simple recipe for backyard barbecues and potlucks, and people always ask for the secret. The beauty is in the shortcut: using oatmeal cookie mix gives you a tender, buttery crust and crumble topping without dragging out half the baking aisle.
Pan of raspberry oat bars cooling on a kitchen counter
Serve these raspberry oat bars slightly warm or at room temperature, cut into small squares for easy nibbling. They pair beautifully with coffee or black tea in the afternoon, or with a scoop of vanilla ice cream for a casual dessert after a cookout.
At a barbecue, I like to set the glass casserole dish right on the buffet table alongside fresh berries and a bowl of lightly sweetened whipped cream so guests can dress up their squares. The bars travel well, so they’re also a good choice for picnics, office treats, or packing into lunchboxes.
3-Ingredient Raspberry Oat Bars
Servings: 12
Ingredients
1 (17–18 oz) pouch oatmeal cookie mix
1/2 cup (1 stick/113 g) unsalted butter, melted and slightly cooled
1 to 1 1/4 cups raspberry preserves (seeded or seedless)
Directions
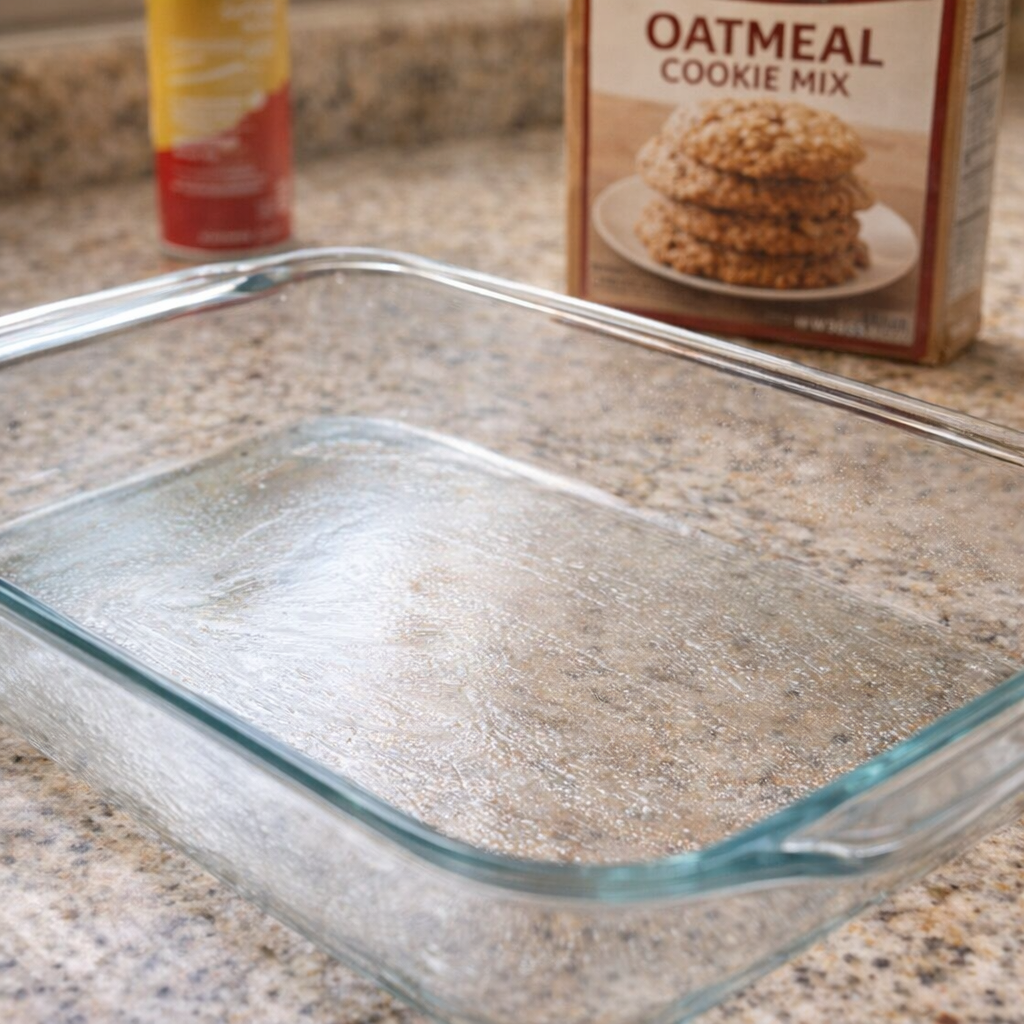
Preheat your oven to 350°F (175°C). Lightly grease a 9x13-inch glass casserole dish or coat it with nonstick spray. This is the same kind of glass baking dish Grandma Helen used, and it lets you see the golden edges as the bars bake.
Glass baking dish being greased on a countertop
In a medium mixing bowl, combine the oatmeal cookie mix and melted butter. Stir with a fork or spatula until the mixture looks evenly moistened and crumbly, with no dry pockets of mix. It should hold together when you press a bit between your fingers.
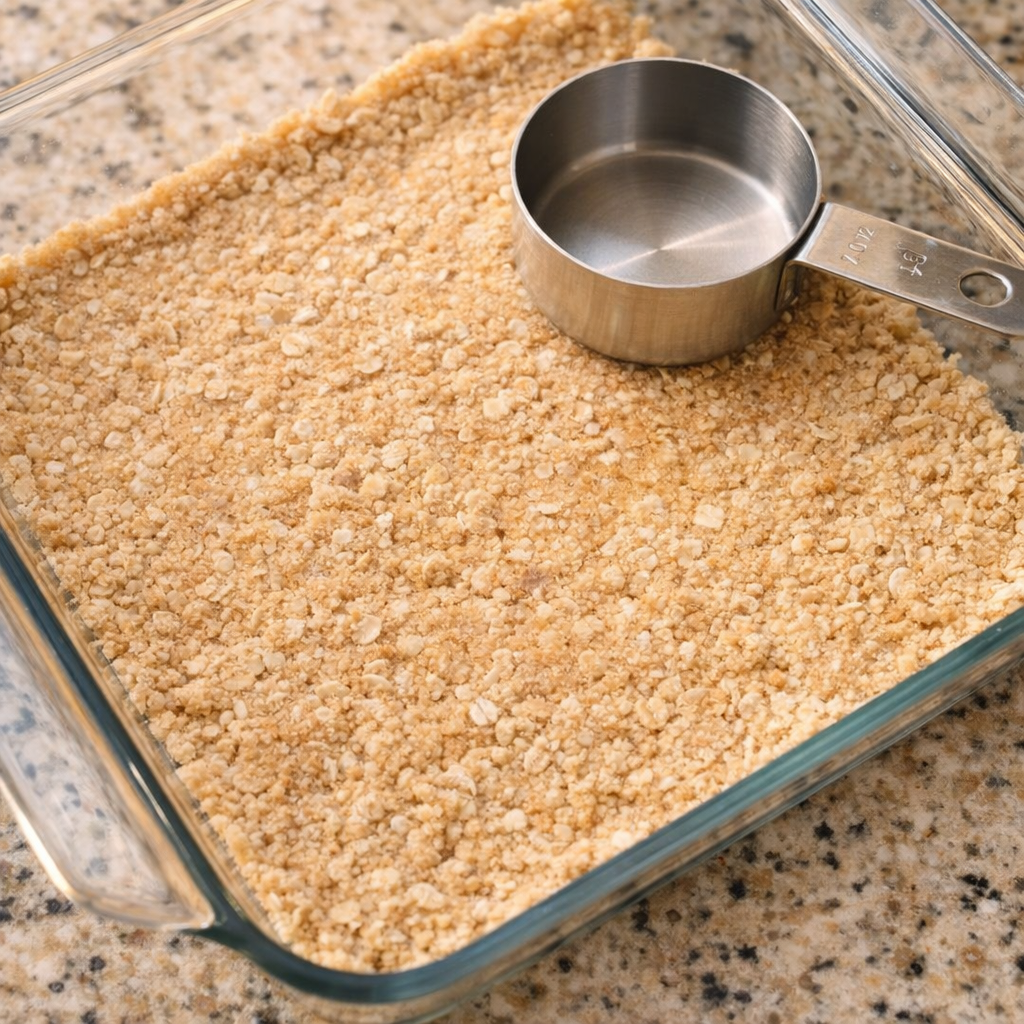
Press about two-thirds of the oat mixture firmly and evenly into the bottom of the prepared glass casserole dish to form the crust. Use your fingers or the bottom of a measuring cup to compact it well, especially into the corners, so the base bakes up sturdy enough to hold the filling.
Oat mixture pressed into a glass baking dish for the crust
Spoon the raspberry preserves onto the crust and gently spread them into an even layer with an offset spatula or the back of a spoon, leaving a very small border around the edges if you like to minimize bubbling over. Aim for a thick, jammy layer so you get a distinct fruity stripe in each bar.
Sprinkle the remaining oat mixture evenly over the raspberry layer, letting some larger clumps form for a classic crumble-top look. Do not press this top layer down too firmly; a light hand keeps the texture pleasantly crisp and crumbly.
Raspberry preserves spread over the crust with crumble topping added
Bake in the preheated oven for 22–28 minutes, or until the top is lightly golden brown and the raspberry filling is bubbling gently around the edges. The exact time will vary slightly depending on your oven and the brand of cookie mix, so start checking at about 20 minutes.
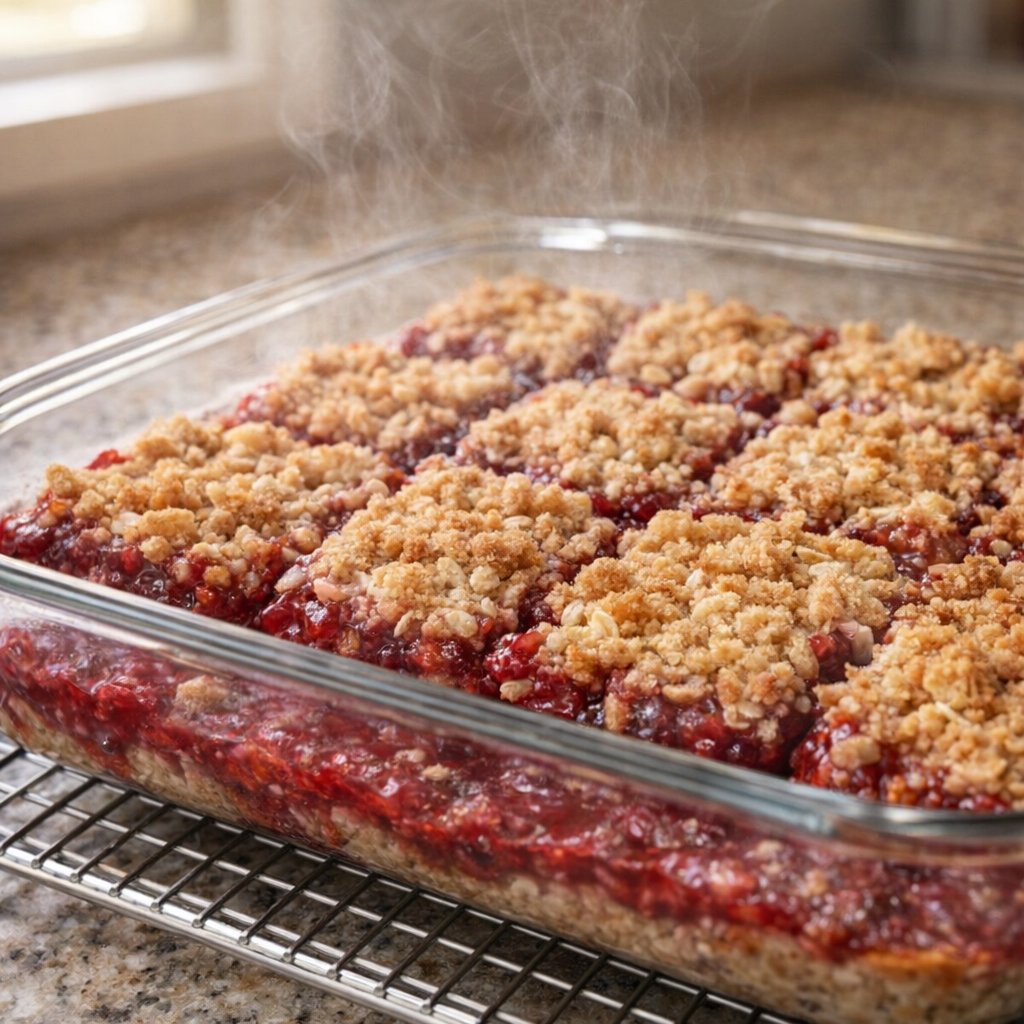
Remove the dish from the oven and place it on a heat-safe surface or cooling rack on your countertop. Let the bars cool completely in the glass casserole dish before cutting, at least 1 hour. The filling will set as it cools; if you cut too soon, the bars may be messy but still delicious.
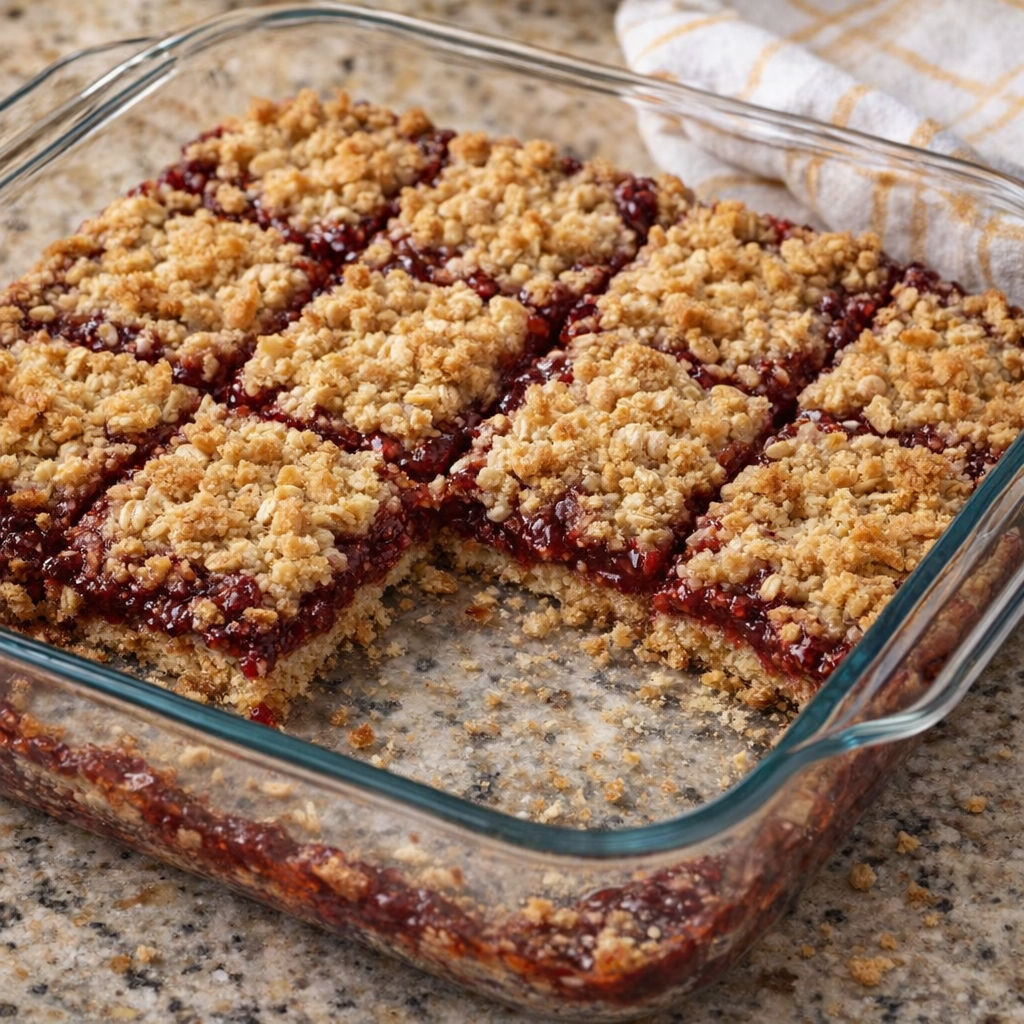
Freshly baked raspberry oat bars with bubbling jam at the edges
Once cool, use a sharp knife to cut the bars into 12 to 16 squares, depending on how generous you’d like the portions. Serve directly from the glass dish, just as Grandma Helen did, or lift out portions with a small spatula and arrange on a platter.
Variations & Tips
You can easily adapt these bars while keeping the three-ingredient spirit. For a slightly thicker, chewier bar, use a smaller glass baking dish (such as 11x7 inches) and bake a few minutes longer, watching that the top doesn’t over-brown. If you prefer a less sweet dessert, choose a low-sugar or all-fruit raspberry preserve; the oatmeal cookie mix is already sweet, so the balance still works.
Cut raspberry oat bars arranged on a simple platter
You can swap in other preserves (apricot, strawberry, or mixed berry) with the same method, or use half raspberry and half another flavor in stripes for a pretty effect. If your cookie mix is on the dry side, add an extra tablespoon of melted butter so the crumbs hold together well. For crisper edges, let the baked bars sit in the turned-off oven, door cracked, for 5–10 minutes after baking.
Food safety tips: Allow the bars to cool completely before covering to avoid condensation, which can encourage mold. Because these are high in sugar and low in moisture, they are safe at room temperature for 2–3 days if tightly covered; for longer storage, refrigerate up to 5 days or freeze well-wrapped for up to 2 months. Always use clean utensils when cutting and serving to avoid introducing bacteria into the pan, and discard the bars if you notice any off smells, mold, or unusual texture.
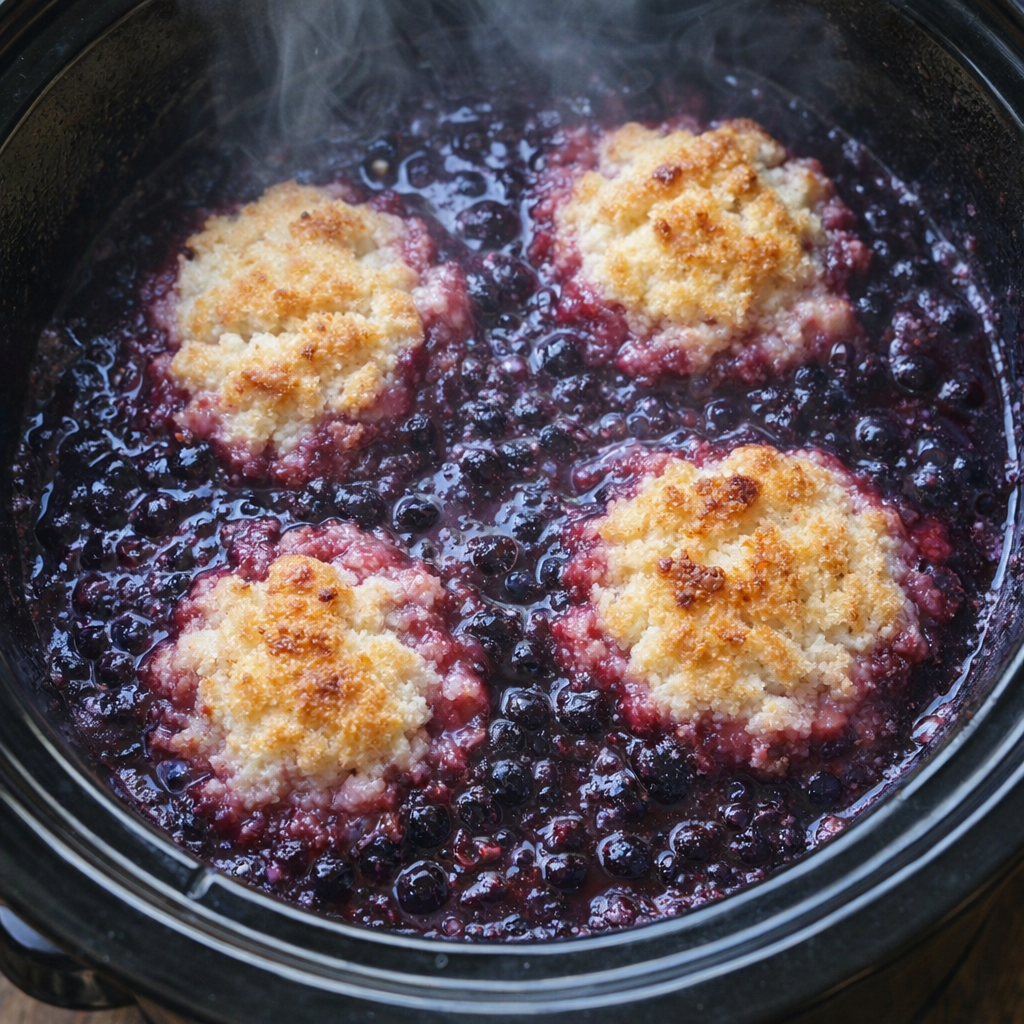
This 4-ingredient slow cooker blueberry grunt is a vintage stove-top dessert reimagined for days when you’d rather let the slow cooker do the work than turn on the oven. Traditionally, a grunt (or slump) is New England’s answer to a cobbler: fruit stewed until jammy, then topped with soft biscuit dough that steams and partially bakes in the bubbling juices.
Using frozen wild blueberries keeps the flavor bright and concentrated, while the slow, moist heat of the cooker gives you that bubbling, magenta fruit base and tender, golden-topped dumplings with almost no hands-on time.
Slow cooker blueberry grunt bubbling in the pot
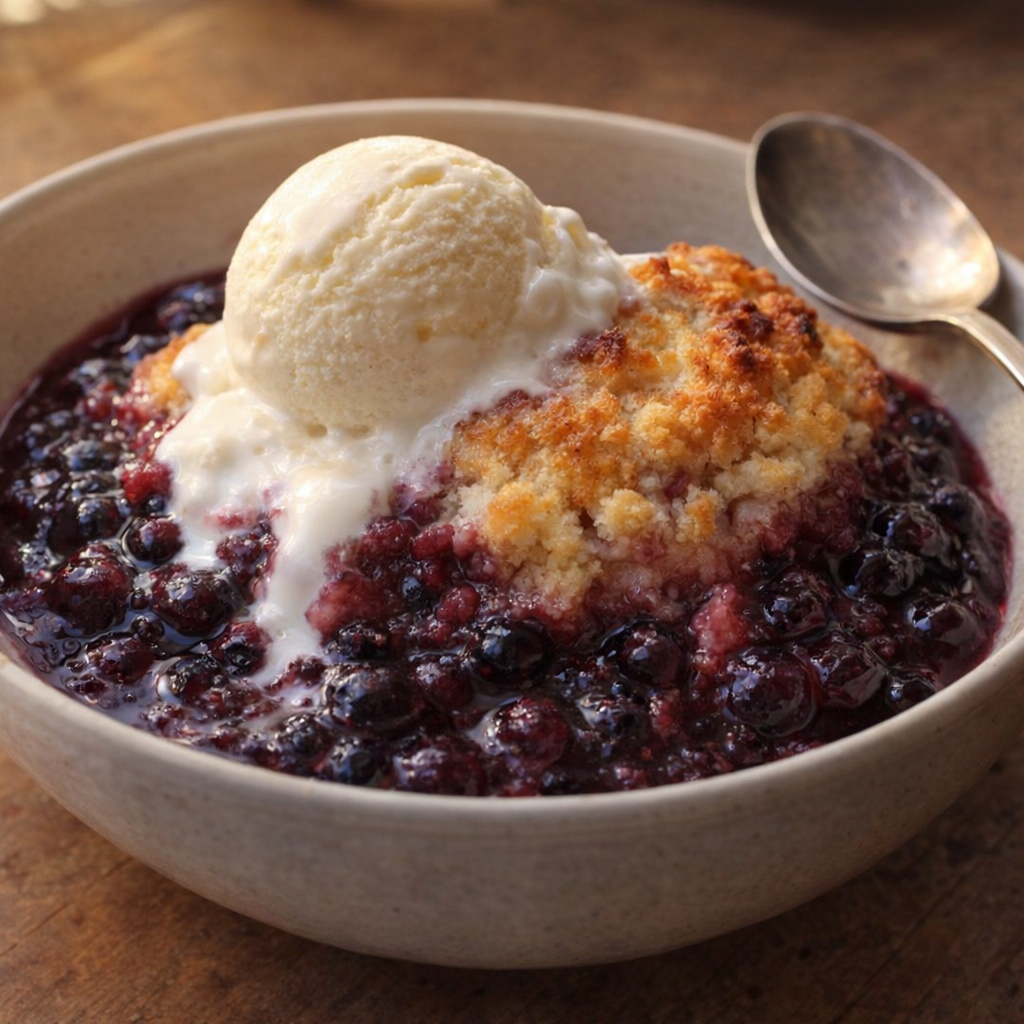
Serve this blueberry grunt warm right out of the slow cooker, spooned into shallow bowls so you catch plenty of fruit and biscuit in each serving. A scoop of vanilla ice cream, frozen yogurt, or lightly sweetened whipped cream plays beautifully against the tart wild blueberries.
For something lighter, offer plain Greek yogurt or a drizzle of heavy cream. Coffee or black tea is a natural pairing, but a small glass of dessert wine or a not-too-sweet hard cider also works nicely for a more grown-up finish.
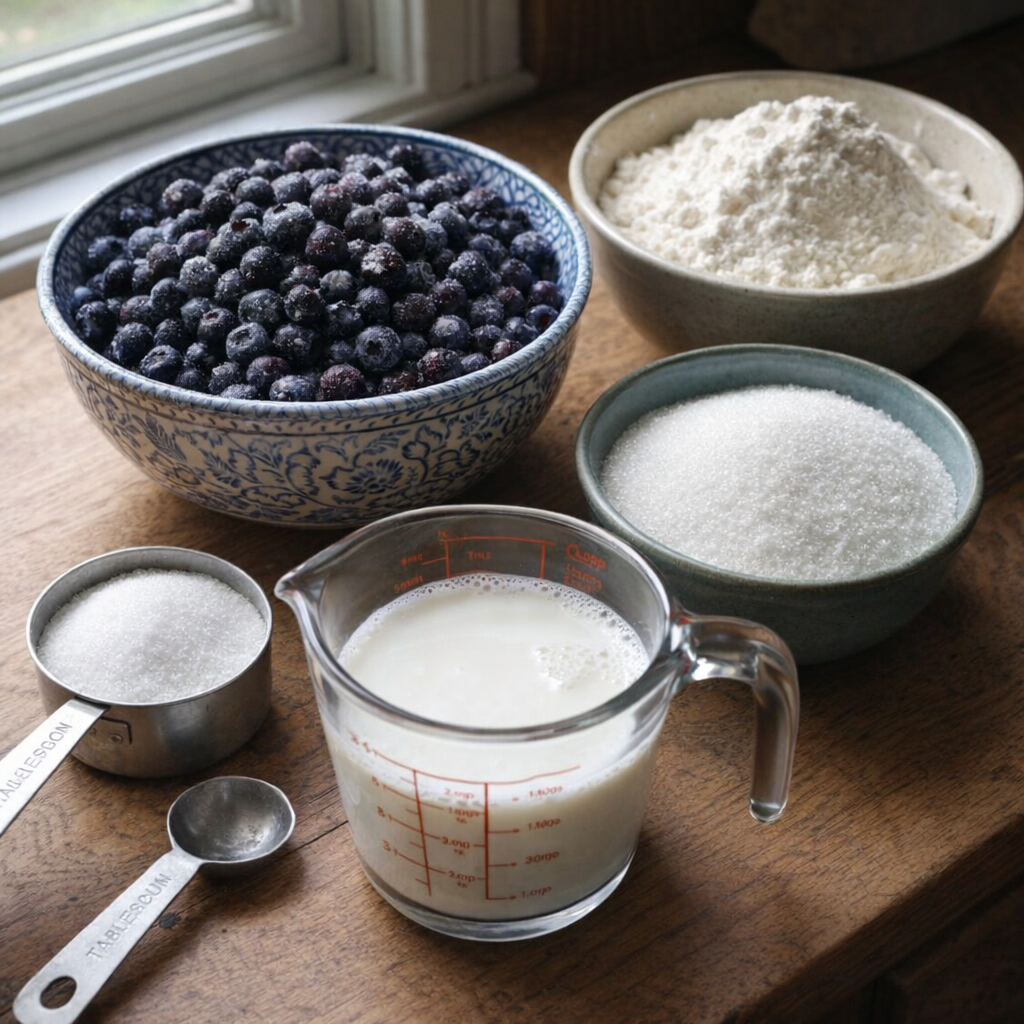
Measured ingredients for blueberry grunt on a kitchen counter
Directions
Lightly mist the inside of a 4- to 6-quart slow cooker with nonstick spray or brush with a thin film of neutral oil to help prevent sticking and make cleanup easier.
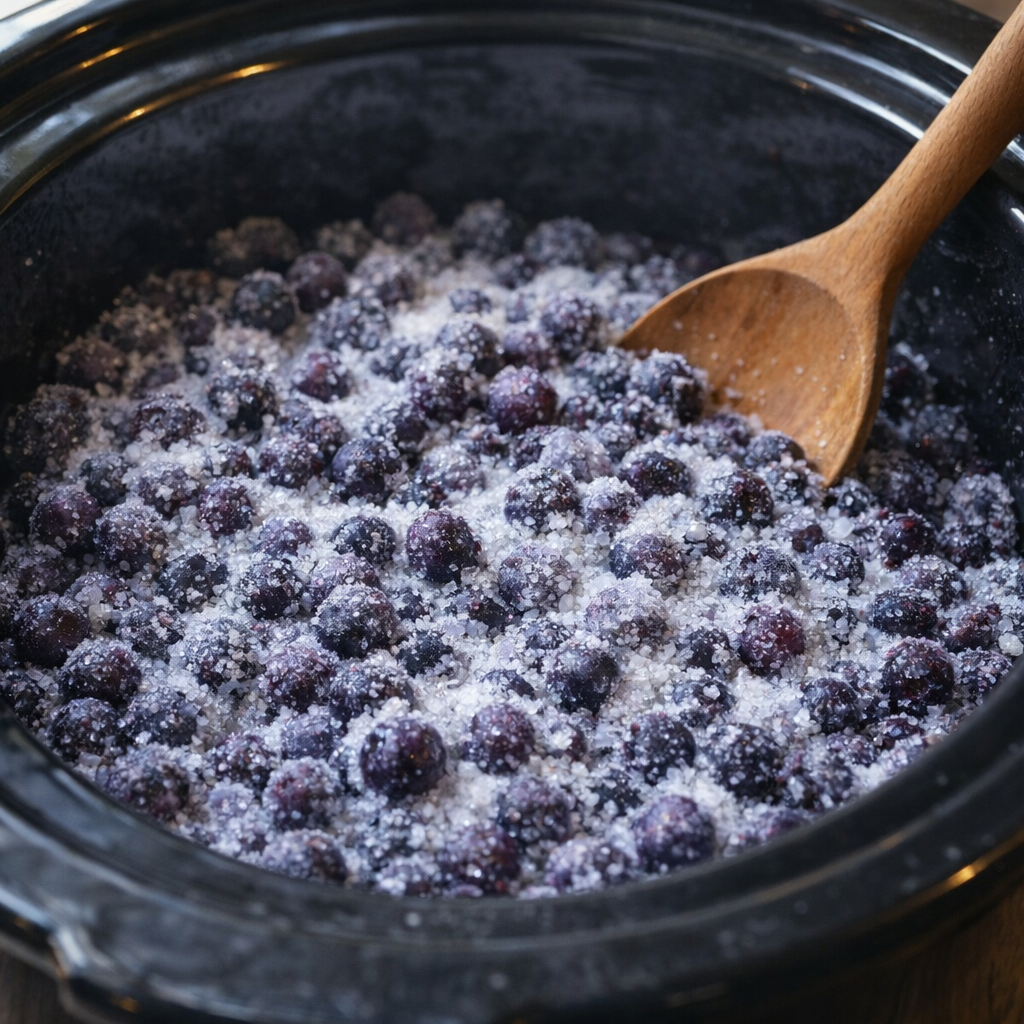
Add the frozen wild blueberries and granulated sugar directly to the slow cooker. Stir gently to coat the berries evenly in sugar, spreading them into an even layer across the bottom.
Frozen blueberries and sugar mixed in a slow cooker insert
Cover the slow cooker and cook the sugared blueberries on HIGH for 1 hour, or until the berries are bubbling vigorously and have released plenty of deep magenta juice. This hot, jammy base is what will steam and partially bake the biscuit topping.
While the blueberries cook, prepare the biscuit-style topping: In a medium bowl, add the self-rising flour. Pour in the milk and stir with a fork or spatula just until a soft, thick batter forms and no dry pockets of flour remain.
The mixture should be thicker than pancake batter but looser than a kneadable dough; avoid overmixing so the topping stays tender.
Thick biscuit batter being mixed in a bowl
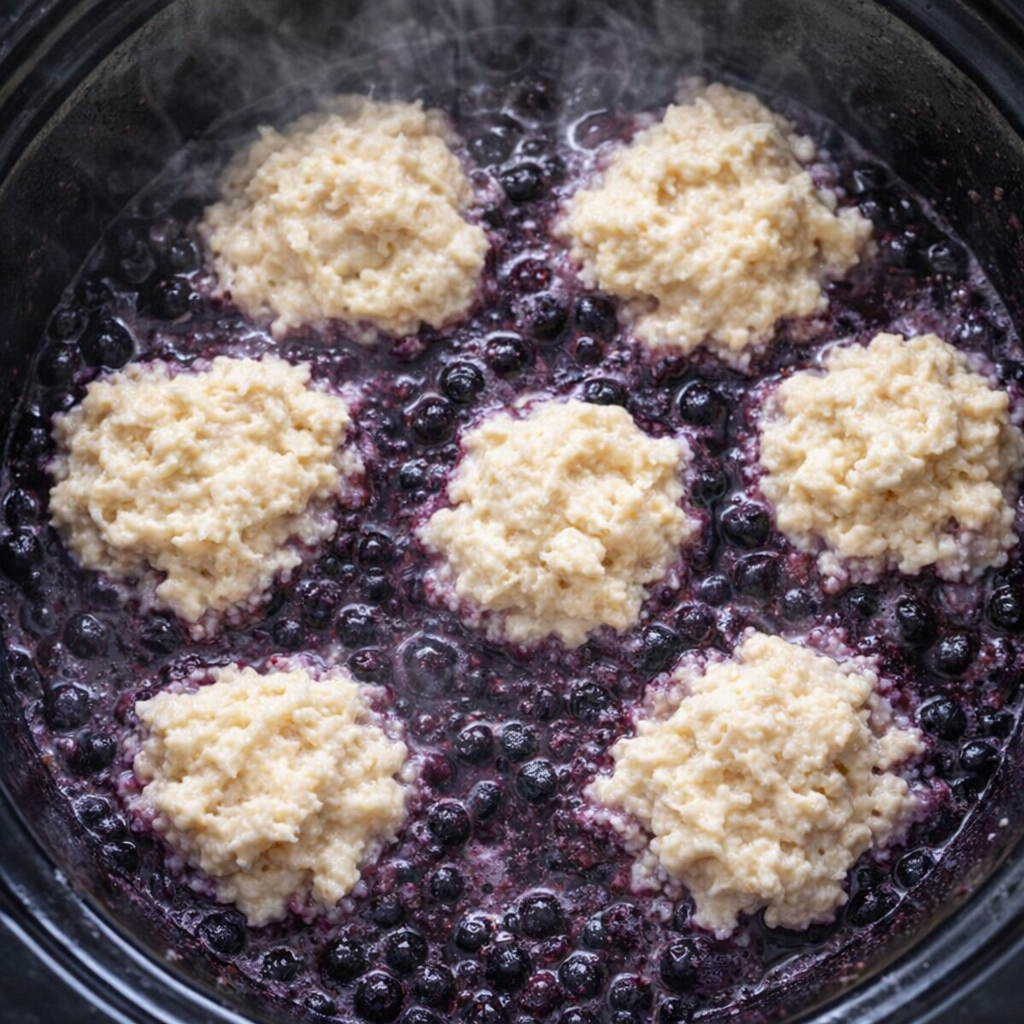
After the blueberries have cooked for about 1 hour and are bubbling around the edges, remove the lid carefully to avoid escaping steam. Give the fruit a gentle stir to ensure even heating, then smooth it back into an even layer.
Using a spoon or small scoop, drop the batter in 8 to 10 mounds over the hot blueberry mixture, spacing them slightly apart. The mounds will spread a bit and puff as they cook, creating a rustic, biscuit-like topping that is partly submerged in the sauce.
Biscuit batter dropped over bubbling blueberries
Cover the slow cooker again, placing a clean kitchen towel or a double layer of paper towels under the lid if possible to catch condensation and help the tops of the biscuits set more nicely. Make sure the towel edges are well away from the heating element.
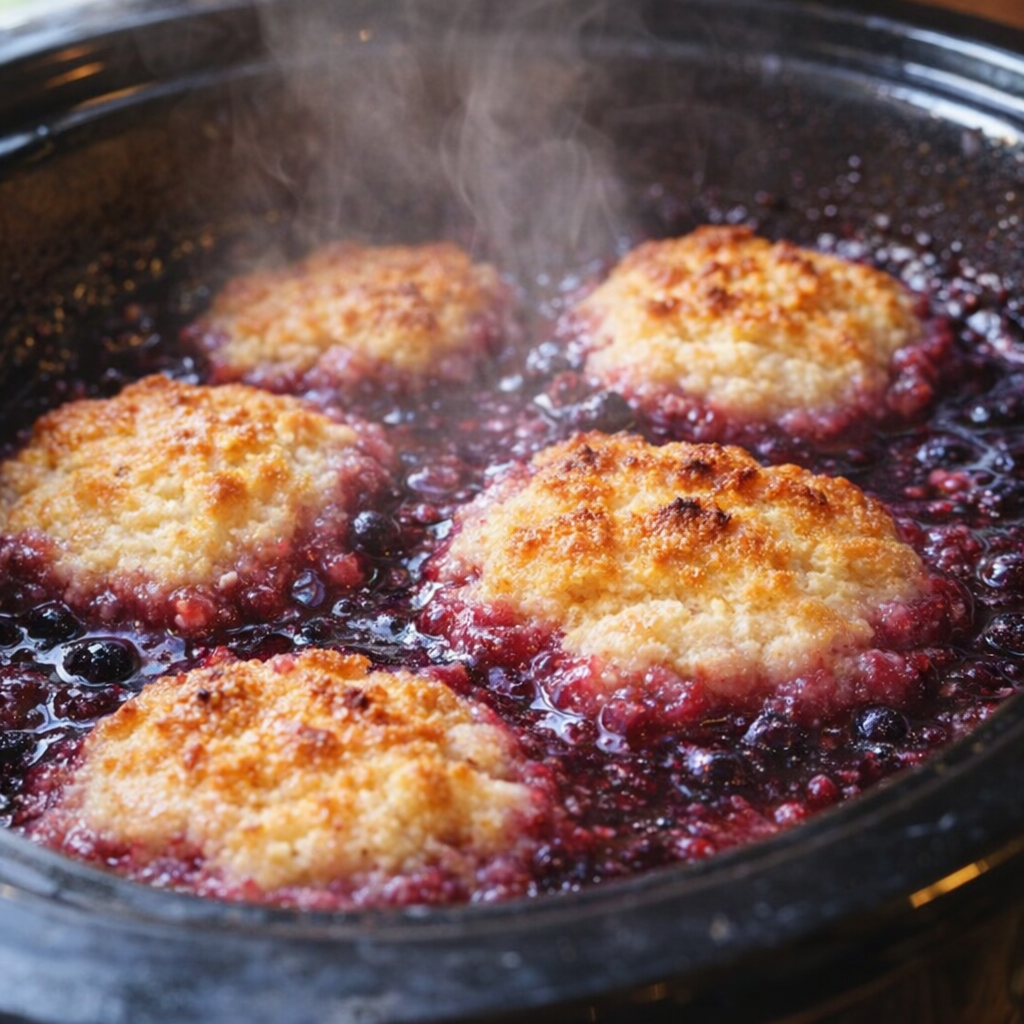
Continue cooking on HIGH for 1 to 1 1/2 hours, or until the biscuit topping is puffed, cooked through in the center, and lightly golden on top. The fruit should be thick, glossy, and bubbling around the edges.
To check doneness, insert a toothpick into the center of one biscuit; it should come out without wet batter, though a few moist crumbs are fine.
Once done, turn off the slow cooker and let the grunt stand, covered, for 10 to 15 minutes. This short rest allows the fruit juices to thicken slightly and the steam to settle, giving you a bubbling, jammy base with a tender, rustic biscuit top that holds its shape when scooped.
Finished blueberry grunt with golden biscuit topping in slow cooker
Serve the blueberry grunt warm, spooning it into bowls so that each portion includes plenty of the deep magenta fruit and a generous piece of the golden biscuit topping. Leftovers can be cooled completely, then stored covered in the refrigerator for up to 3 days; rewarm gently in the slow cooker on LOW or in the microwave before serving.
Variations & Tips
Self-rising flour is the quiet workhorse here: it already includes leavening and salt, which is why we can keep the ingredient list to just four items. If you don’t have self-rising flour, you can approximate it by whisking 1 1/2 cups all-purpose flour with 2 1/4 teaspoons baking powder and 1/2 teaspoon fine salt before adding the milk (this technically adds ingredients, but the method and result remain the same).
For a slightly richer topping, you can substitute up to half of the milk with heavy cream. If you prefer a less sweet dessert, reduce the sugar in the fruit to 1/2 cup; wild blueberries are naturally tart, so taste and adjust the next time you make it. A teaspoon of vanilla or a pinch of cinnamon stirred into the batter will give a more aromatic, old-fashioned bakery note without changing the structure.
For a brighter flavor, stir a squeeze of lemon juice into the hot fruit just before adding the batter. Food safety tips: Always start with frozen berries straight from the freezer so they remain at a safe temperature until cooking begins. Keep the slow cooker on HIGH for the times specified to ensure the fruit and dough reach a safe internal temperature; avoid extended time on WARM, which may hold food in the temperature “danger zone” if used for cooking rather than just holding.
If you use a kitchen towel under the lid, make sure it does not hang near the heating elements or outside the cooker where it could pose a fire risk. Cool leftovers promptly and refrigerate within 2 hours; reheat only the amount you plan to eat, and discard any portions that have been left at room temperature for more than 2 hours.
This southern 3-ingredient deviled ham spread is the kind of thing that quietly steals the show at a block party or church potluck. My neighbor brought a little glass platter of it to our street gathering last summer, and my dad went back so many times I finally had to march over and ask her what in the world was in it. I was sure it had to be some long, fussy recipe, but she just laughed and told me it was only canned deviled ham, cream cheese, and sweet pickle relish. It tastes like something our mothers and grandmothers would have set out with crackers on a Sunday afternoon—simple, thrifty, and just plain good.
Serve this deviled ham spread well-chilled on a glass serving platter, mounded in the center with a little spoon tucked in the side, and surround it with crisp buttery crackers or sturdy saltines. It’s also lovely spread on soft white sandwich bread for little tea sandwiches, or tucked into celery sticks for something a bit lighter. A plate of sliced cheddar, some dill pickles, and a bowl of potato chips or pretzels make it feel like an old-fashioned snack spread, perfect for card night, tailgates, or a lazy Sunday supper.
Southern 3-Ingredient Deviled Ham Spread
Servings: 8
Ingredients
2 (4.25-ounce) cans deviled ham (such as Underwood), well drained
8 ounces cream cheese, softened
1/3 cup sweet pickle relish, well drained
Directions
Place the softened cream cheese in a medium mixing bowl. If it’s still a bit firm, mash it gently with a fork or the back of a spoon until smooth and easy to stir.
Add the well-drained deviled ham to the bowl with the cream cheese. Use a fork to break up any larger pieces of ham so it mixes evenly into the cream cheese.
Stir the cream cheese and deviled ham together until the mixture is mostly smooth and evenly pink, with no big streaks of plain cream cheese showing.
Add the well-drained sweet pickle relish to the bowl. Fold it in gently until it’s evenly distributed, giving the spread a slightly textured look from the relish and ham.
Taste the spread and, if you like, adjust the texture by adding a spoonful more deviled ham for a meatier spread or a spoonful more cream cheese for a milder, creamier spread. (This is optional and still keeps it to the same three ingredients.)
Spoon the deviled ham spread onto a glass serving platter and use the back of the spoon to gently smooth it into a low mound or oval shape. You can add a few shallow swirls or ridges on top for a homemade look.
Cover the platter lightly with plastic wrap and refrigerate for at least 1 hour, or until well chilled and slightly firm. This resting time lets the flavors come together and makes it easier to scoop neatly with crackers.
Just before serving, remove the plastic wrap and set the platter on the table. Arrange crisp golden crackers all around the spread and serve chilled, letting guests scoop the spread onto crackers as they like.
Variations & Tips
You can keep the heart of this recipe—three simple ingredients—while tailoring it to your own table. For a touch more tang, use whipped cream cheese instead of block cream cheese; it blends faster and gives a slightly lighter texture. If your family prefers more sweetness, add an extra spoonful of sweet pickle relish (just be sure to drain it very well so the spread doesn’t get watery). For a smokier flavor, choose a smoked-style deviled ham if you can find it. You can also shape the chilled mixture into a small cheese-ball style mound and roll just the outside in very finely crushed buttery crackers for a bit of crunch while still leaning on the same core ingredients. Food safety tips: Always keep this spread refrigerated until serving, and don’t leave it out at room temperature for more than 2 hours (or 1 hour if it’s a very hot day or you’re outdoors). Because it contains meat and dairy, store any leftovers in a covered container in the refrigerator and enjoy within 3 to 4 days. If you’re making this ahead, be sure your hands, utensils, and bowl are clean, and keep the ingredients cold up until mixing to maintain freshness.
This slow cooker 4-ingredient Amish buttered noodles recipe is my cozy, no-fuss side dish for nights when I just don’t know what to make. It’s inspired by the simple, buttery egg noodle dishes you find at church potlucks and Amish-style diners here in the Midwest—nothing fancy, just pure comfort.
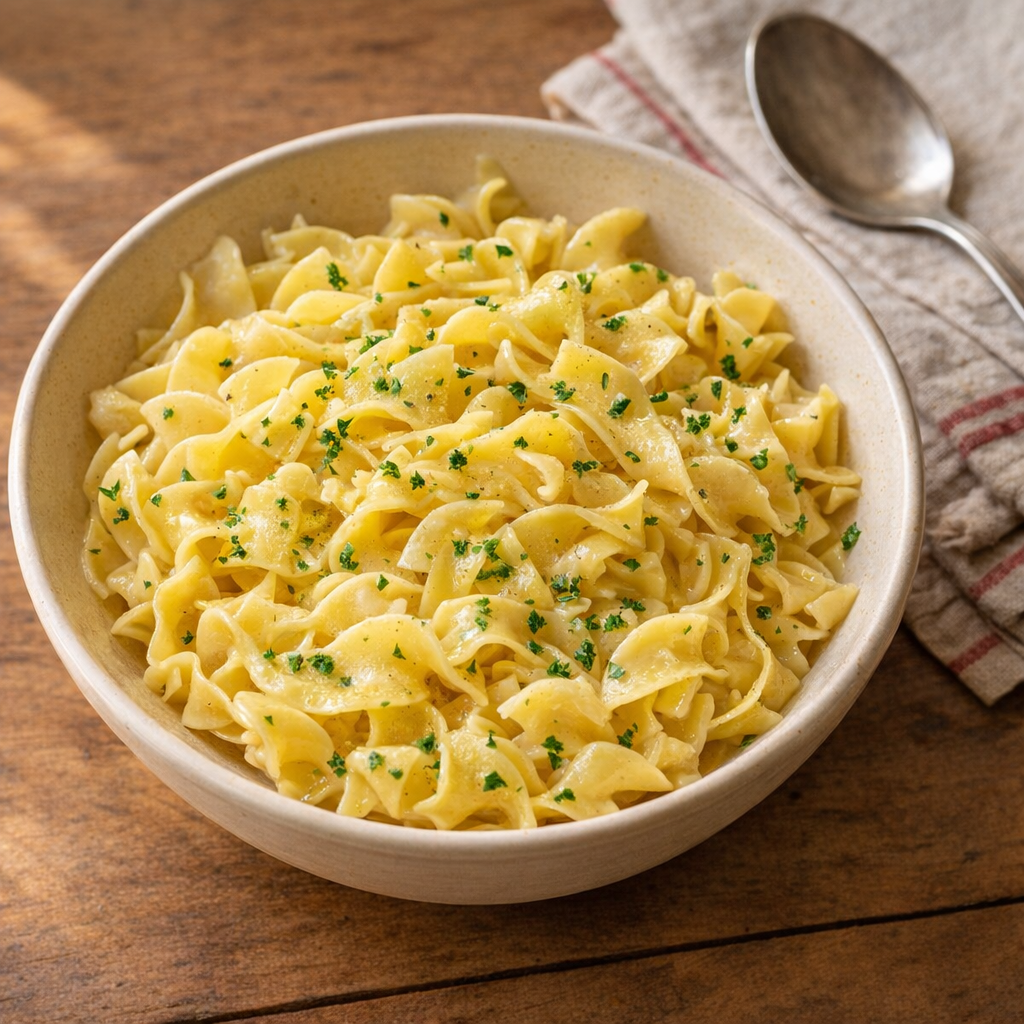
Slow cooker buttered noodles in a serving bowl
You literally pour chicken broth over dry egg noodles in the slow cooker, add butter and a little seasoning, and let it all soak up into tender, flavorful noodles the whole family can enjoy.
These noodles are wonderful alongside roasted or rotisserie chicken, meatloaf, pork chops, or a simple pan-fried sausage. They also pair nicely with steamed green beans, peas, or a tossed salad to add some color to the plate.
For a fuller meal, spoon them into a bowl and top with leftover shredded chicken or beef. They’re also a great “bring-along” dish for potlucks and family gatherings since they stay warm nicely in the slow cooker.
Slow Cooker Amish Buttered Noodles
Servings: 6
Ingredients
12 oz dry wide egg noodles
4 cups low-sodium chicken broth
1/2 cup (1 stick) unsalted butter, cut into pieces
1 1/2 tsp seasoned salt (or to taste)
Egg noodles, butter, broth, and seasoning on a kitchen counter
Directions
Lightly coat the inside of your slow cooker with nonstick spray or a small amount of butter to help prevent sticking.
Pour the dry egg noodles evenly into the bottom of the slow cooker, spreading them out so they’re in a fairly even layer.
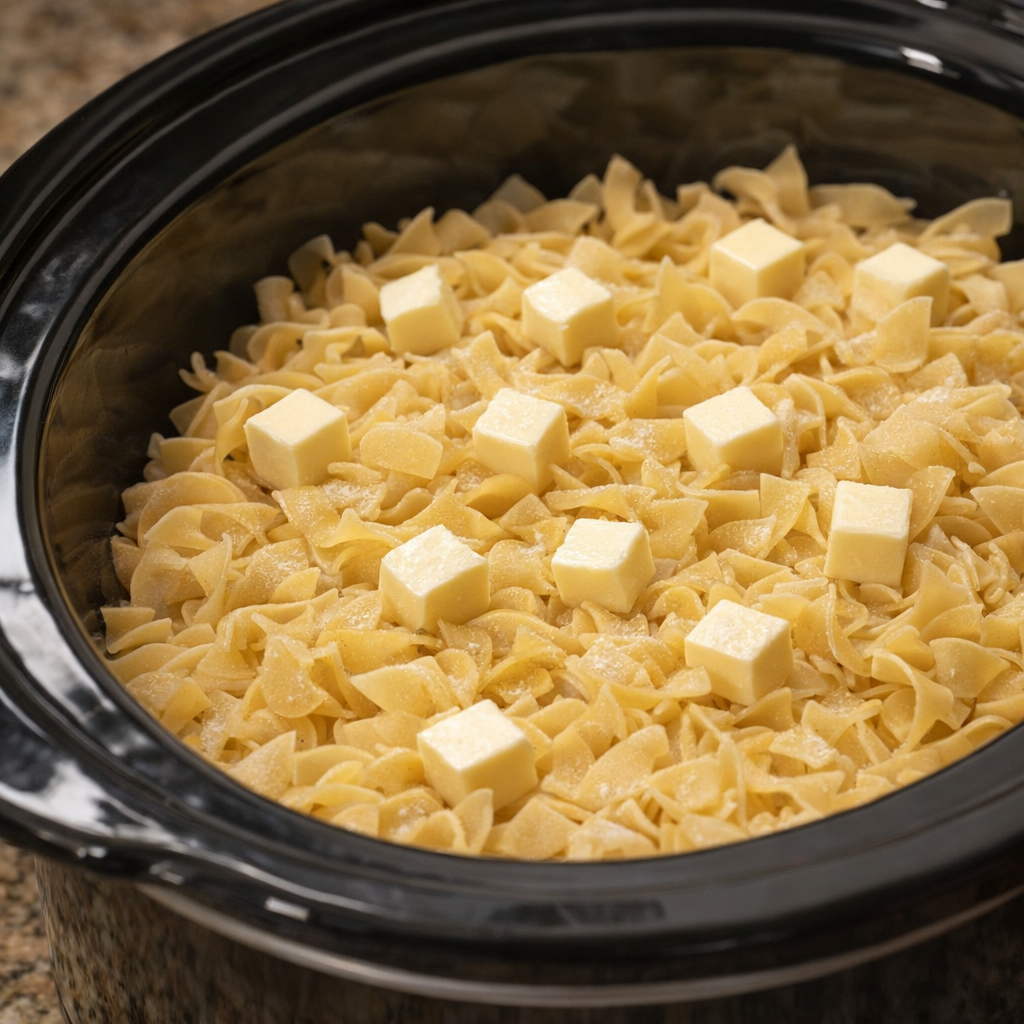
Scatter the butter pieces over the top of the dry noodles, tucking a few down into the noodles so they melt evenly.
Butter pieces scattered over dry egg noodles in a slow cooker
Sprinkle the seasoned salt over the noodles and butter.
Slowly pour the chicken broth over the dry egg noodles in the slow cooker, making sure all the noodles get moistened. Gently press down with a spoon if needed so most of the noodles are submerged in the broth.
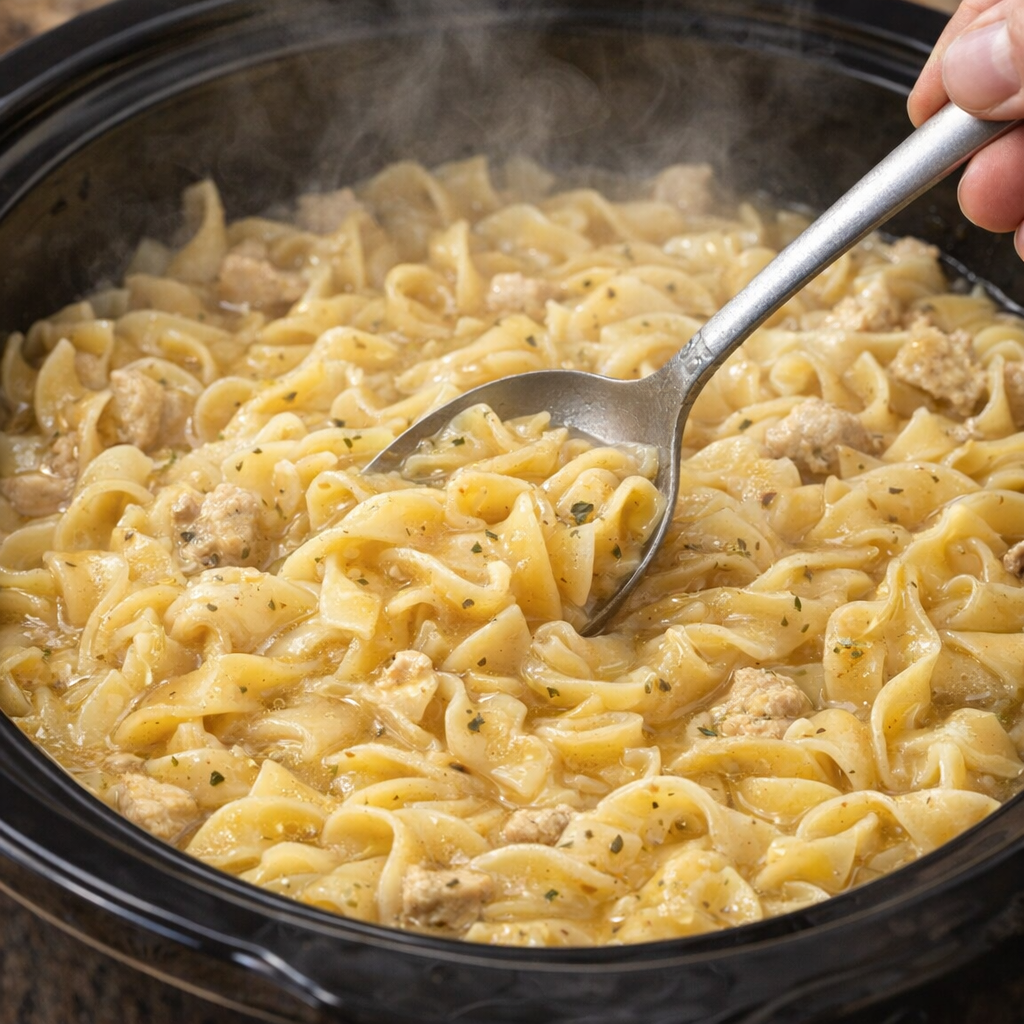
Cover and cook on LOW for 2 to 3 hours, or until the noodles are tender but not mushy. Around the 1 1/2- to 2-hour mark, gently stir from the bottom to help the noodles cook evenly and absorb the buttery broth.
Cooked buttered noodles being stirred in the slow cooker
Once the noodles are tender and most of the liquid is absorbed into a light, buttery sauce, taste and adjust the seasoning with a bit more seasoned salt if needed.
Turn the slow cooker to WARM and serve the noodles straight from the crock. Give them a gentle stir right before serving to redistribute the butter and seasoning.
Variations & Tips
For picky eaters, you can cut back slightly on the seasoned salt at first and let everyone add a pinch at the table. If your family likes a creamier noodle, stir in 1/4 to 1/2 cup of sour cream or a splash of heavy cream right at the end of cooking.
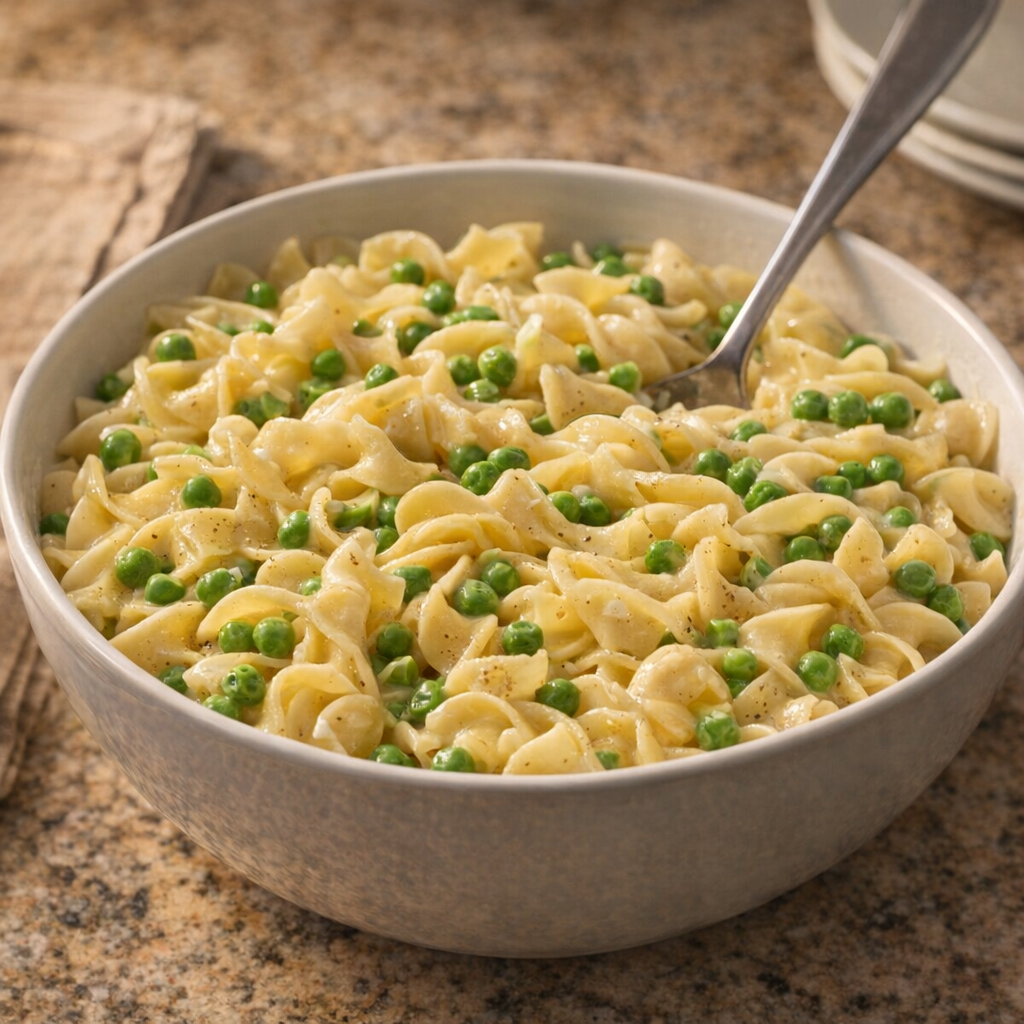
Creamy buttered noodles with peas in a family-style bowl
To sneak in a little extra nutrition, fold in a cup of frozen peas or mixed vegetables during the last 20–30 minutes of cook time. If you prefer a bit more flavor, add 1/2 teaspoon of garlic powder or onion powder along with the seasoned salt, or finish with a sprinkle of black pepper.
For a heartier dish, stir in shredded rotisserie chicken, leftover roast beef, or diced ham at the end and let it warm through on LOW for about 10 minutes. If the noodles ever seem a bit dry, you can splash in an extra 1/4 to 1/2 cup of warm chicken broth and gently stir until they reach your favorite texture.